bloom
an adaptive tone shaper
user manual
Contents
- 1. Introduction
- 2. Quickstart
- 3. Main section
- Amount
- Squash range
- Attack
- Release
- 4. Processing graph
- Upper and lower processing range
- Processing range mode selector
- Low cut and high cut filters
- 5. Tone controls
- Tone control toggle
- Tone level
- Band listen
- Tone control
- Tone frequency control
- 6. Quality selector
- 7. Stereo section
- Stereo mode selection
- Stereo controls
- 8. Output and calibration
- Squash cal
- Wet trim
- Mix
- Output
- 9. Toolbar
- Undo/redo
- Comparing settings with A/B switching
- Sidechain
- Preset menu
- Config menu
- Window resize menu
- 10. Miscellaneous
- 11. Paths for presets and uninstallation
- macOS
- Windows
- FAQ and support
Last modified on March 12th, 2024
1. Introduction
Bloom is an adaptive tone shaper. It analyzes the incoming signal and applies corrections to the perceived tonal balance of the sound by cutting or boosting frequencies. Because of its adaptive nature, the corrections are constantly changing depending on the input signal.
Bloom makes the sound more balanced by automatically cutting unwanted elements and boosting where necessary. You can fine-tune the processing according to your preferences. Bloom automatically compensates for changes made in one frequency area by adjusting others, to achieve a balanced sound.
It is recommended to read through the manual to understand all the details around Bloom. If you want to get started quickly, read our quickstart guide below:
2. Quickstart
- Start with the “Factory default” preset and turn the amount to 7.0.
- Use the tone controls to adjust the processing to suit your taste. Adjust the frequency and level by moving the tone controls.
- Use the automatic adjustment for wet trim and squash cal by clicking “Set”. This helps you A/B compare the results.
- Try squashing the signal. Raise the amount until you see the squash indicator showing the amount of squashing.
- Adjust attack and release according to the sound source, if needed.
- Toggle bypass to compare the result with the dry signal.
- Adjust amount if necessary.
3. Main section
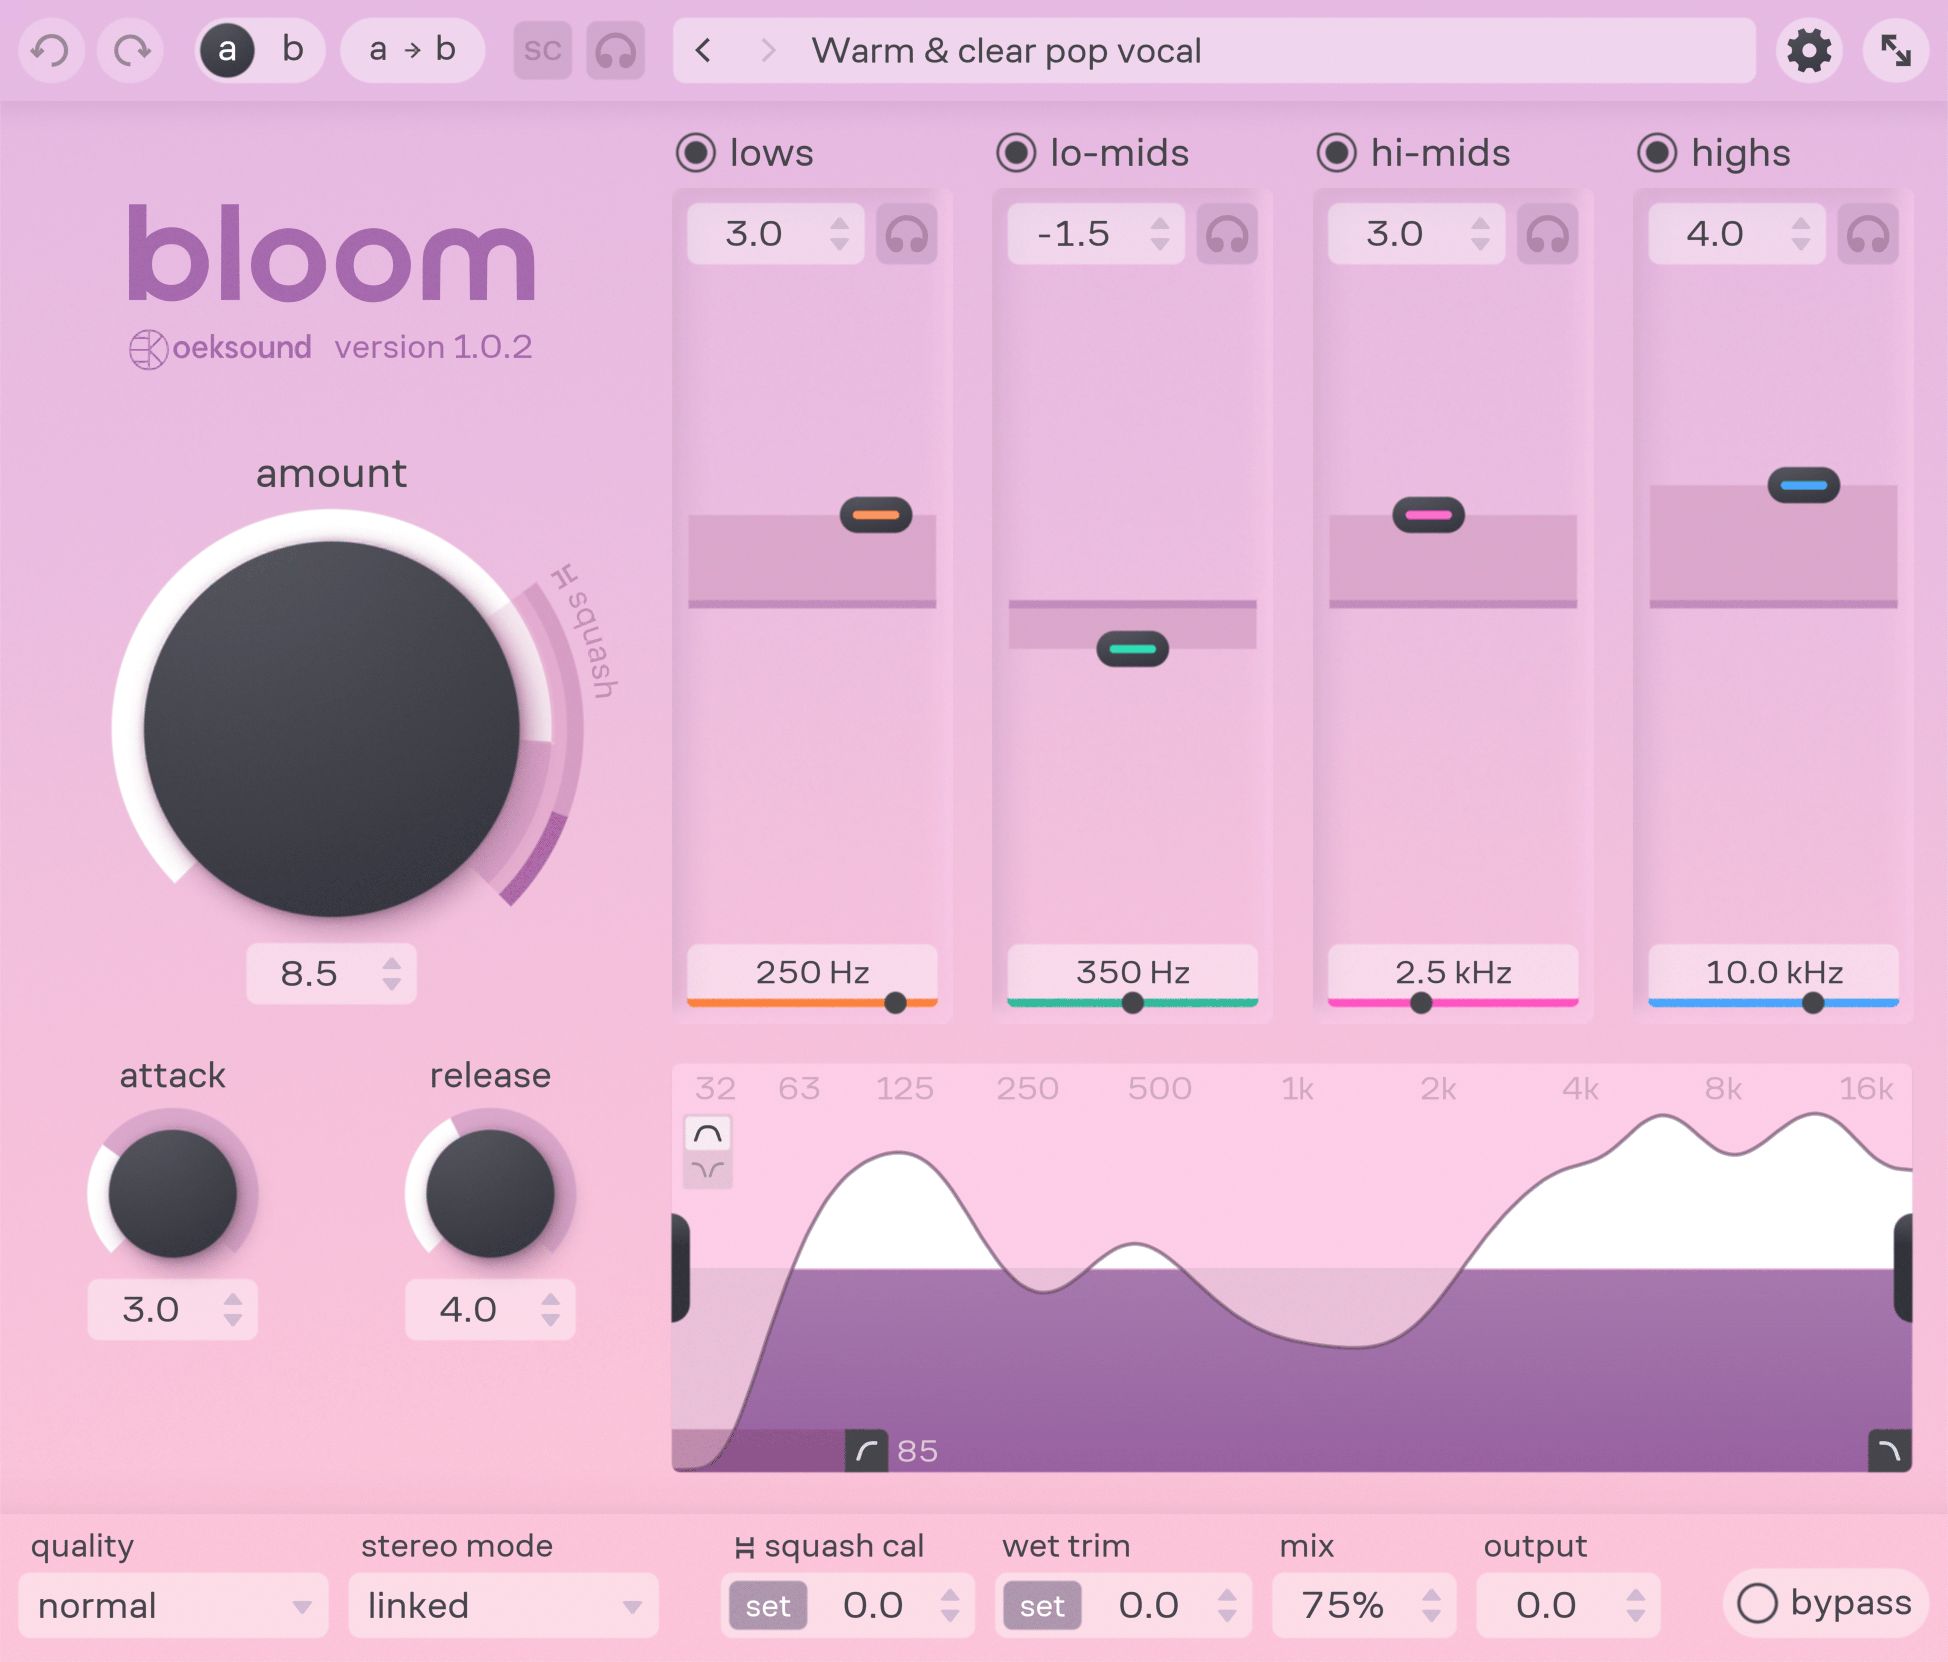
Amount
Controls how much overall processing is applied to the signal. The higher the value, the more the audio is adaptively boosted and attenuated.
The lower range (from 0-3) of amount is scaled for fine control to allow for more subtle adjustments. The processing is level-independent when amount values range from 0-7. In values from 7-10 is the squash range, where the processing becomes progressively more level-dependent.
Squash range
Frequency-dependent upward and downward compression is applied when the amount is set above 7.0. The squash meter shows the amount of average signal compression in purple.
The squash threshold is frequency-dependent and mapped to model the equal-loudness contour. This means that the frequency ranges where the ear is:
- least sensitive, squash compression has a harder knee and higher threshold
- more sensitive, squash compression has a softer knee and lower threshold
This results in more compression in the frequency areas where the ear is more sensitive.
Note, the squash meter shows only an approximate indication, as the amount of squashing is frequency-dependent.
In level-dependent processing, the level of the input signal affects how the processing is applied. This means that the processing will affect the level of the outgoing signal by affecting the dynamic range. To calibrate the amount of squashing in relation to the input signal, use the squash cal control.
Without squashing, Bloom’s processing is level-independent. This preserves the original shape and dynamics of the signal, which can be especially beneficial for vocals or voice-overs.
More squashing can be good for drastic tonal shaping, pushing the signal up front, or creative uses. Squashing can be also used for parallel processing with mix, for example on drum channels.
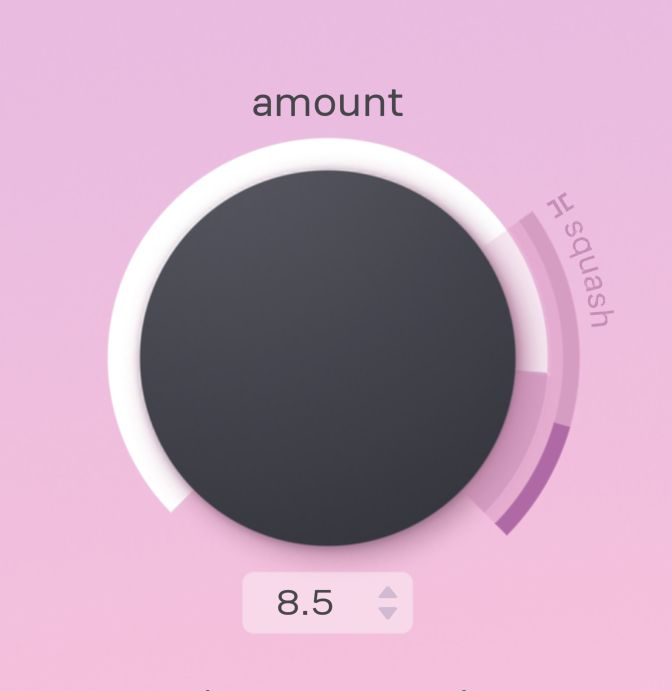
Attack
Controls how quickly Bloom applies its changes after upward level changes in the input signal. Its values range from fast to slow. With faster attack, the processing reacts faster to higher energy levels. In other words, Bloom cuts the signal faster with higher input level changes in a given frequency area.
The default value is set to work as a good starting point for many instruments and vocals.
Release

Controls how quickly Bloom recovers after downward level changes in the input signal. Its values range from fast to slow. Essentially, with faster release, the processing reacts faster to low energy levels. For example, if the input signal level drops in a given frequency area, fast release means the signal is boosted faster.
The default value is set to work as a good starting point for many instruments and vocals.
4. Processing graph
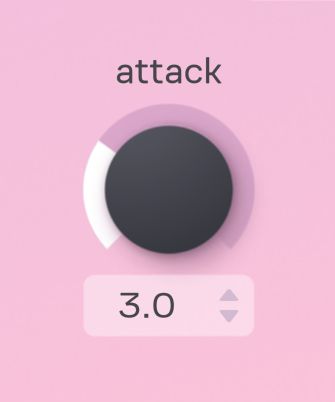
The processing graph shows how the signal is being processed. The graph represents the relative changes applied to the signal, as shown by the solid black line.
- The purple area represents the parts of the signal present in both unprocessed and processed signals.
- The gray area under the middle line represents cuts.
- The white area above the middle line represents boosts.
When hovering over a tone control, the processing curve shows its contribution with the color of the tone control. This can be seen in the picture below where the lo-mid tone control is hovered:
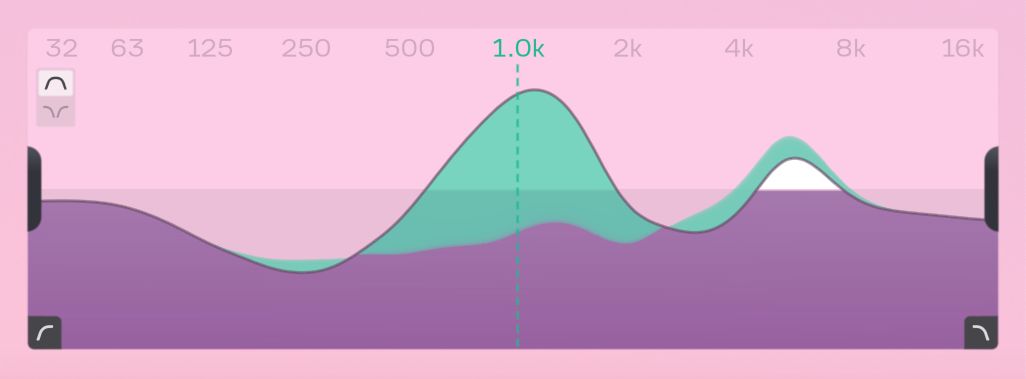
- The colored areas over the black line are the parts of the signal that are cut by the band contribution.
- The colored areas under the black line are the parts that are boosted by the contribution.
The center frequency of the tone control is indicated with a colored dashed line.
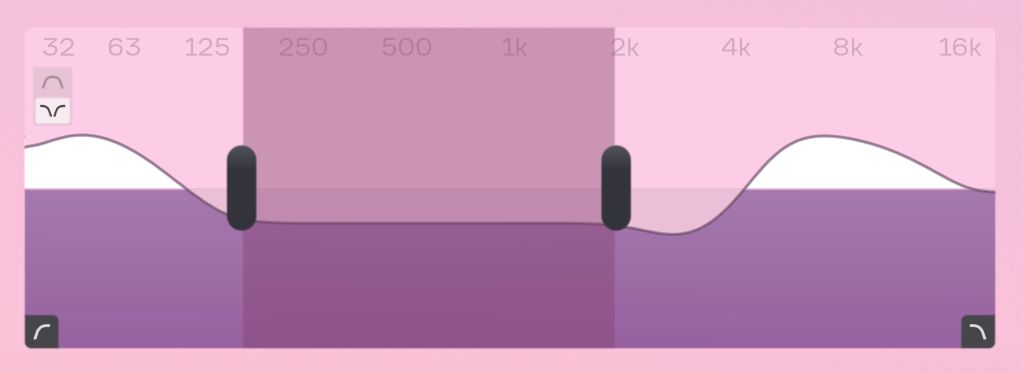
Upper and lower processing range
Limit the frequency range of the processing by dragging the handles on the edges of the processing graph.
The areas outside the processing range are shown as dimmed and are not processed. This is useful if you want to, for example, squash higher frequencies but leave the low frequencies unprocessed.
The upper and lower processing range control slopes are 12 dB / oct normally. When the processing range filters are brought close to each other, the slopes smoothly steepen towards 24 dB / oct.
Processing range mode selector
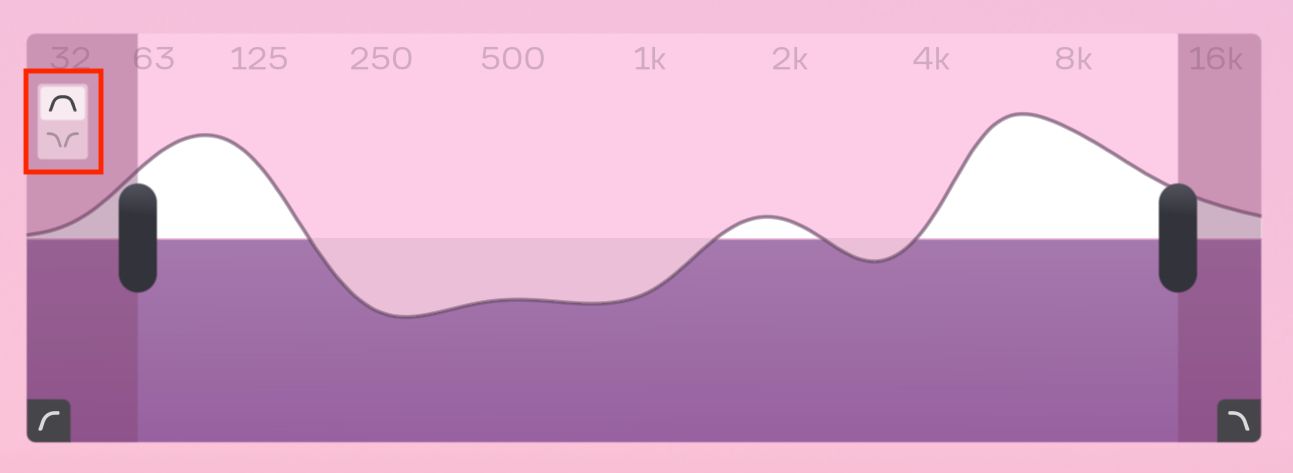
Use the include and exclude modes in the upper left corner of the processing graph to change the processing range. The include mode is selected by default. With it, the processing range is the area in the middle defined by the upper and lower processing range handles.
In the exclude mode, the processing range is the upper and lower frequency areas, excluding the middle area for processing. This means that the frequencies above the upper processing range handle, and the frequencies below the lower processing range handle are processed.
Low cut and high cut filters

The low cut and high cut filters limit the output frequency range. Their cutoff frequency can be changed by dragging them on the lower edges of the processing graph. The filter slopes for the filters are 18 dB / oct and are not adjustable.
When inactive, the cutoff frequency is not shown, and hovering above the filter will show “off”.
5. Tone controls
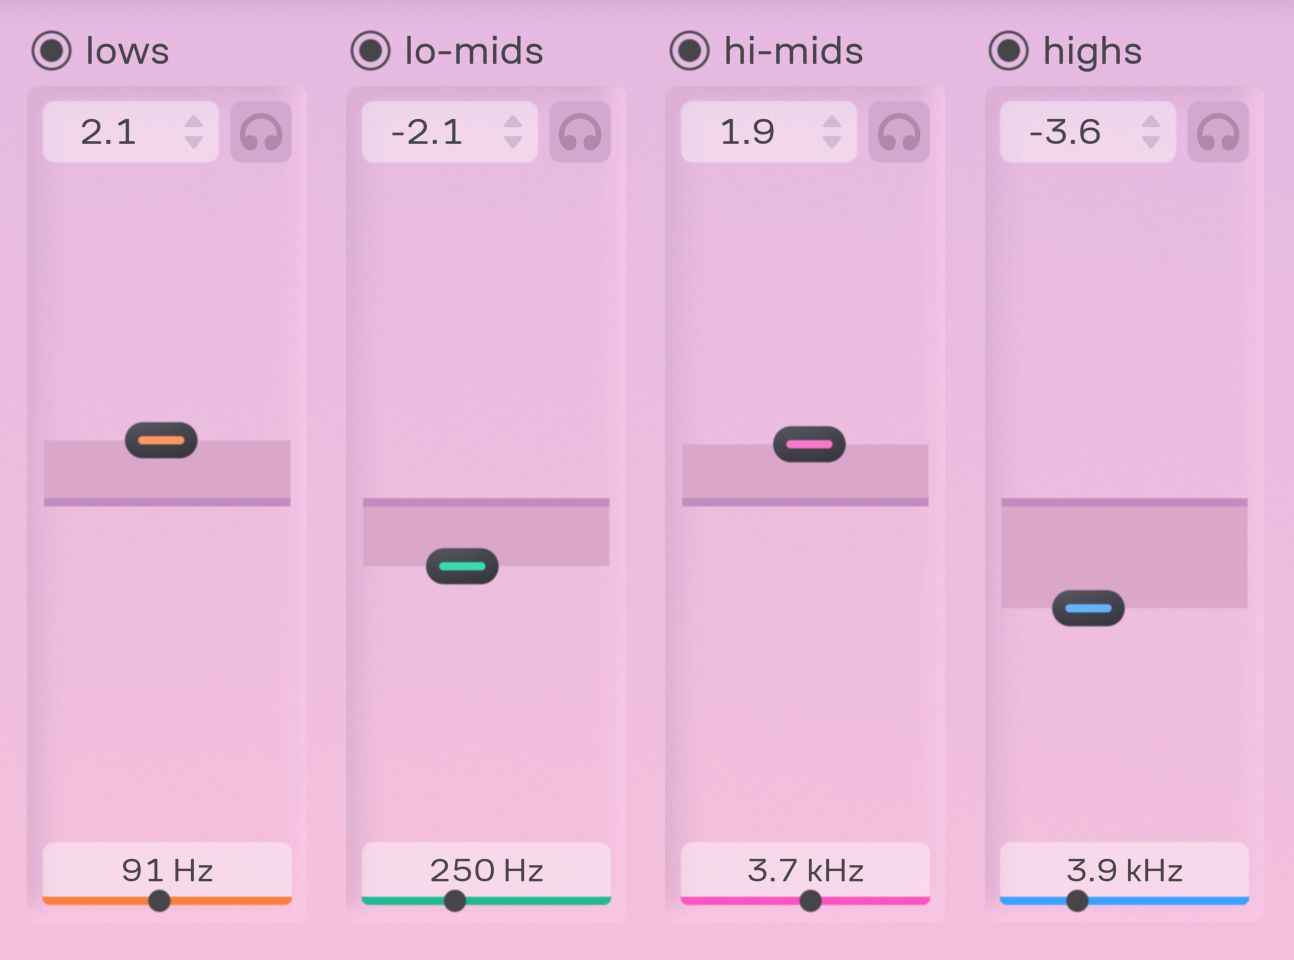
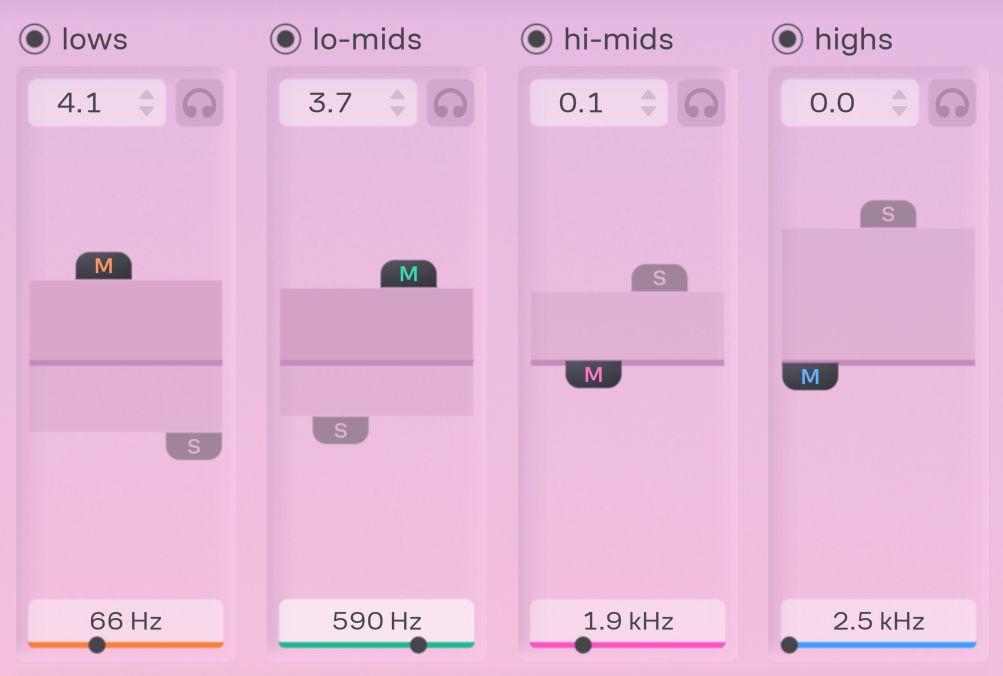
Use the tone controls to adjust the tone of the corrections made by Bloom. These corrections are made according to the spectral trend of the input. The tone is adjusted using the four tone control handles (lows, lo-mids, hi-mids, highs).
Tone control toggle

Toggles the tone control active or inactive.
- When active, a solid circle is shown and the tone control affects the processing.
- When inactive, a hollow circle is shown and the tone control does not affect the processing.
Note that the tone controls most affect their respective frequency area (i.e., lows, lo-mids, hi-mids, highs). However, all tone controls also affect the whole processing range to some extent.
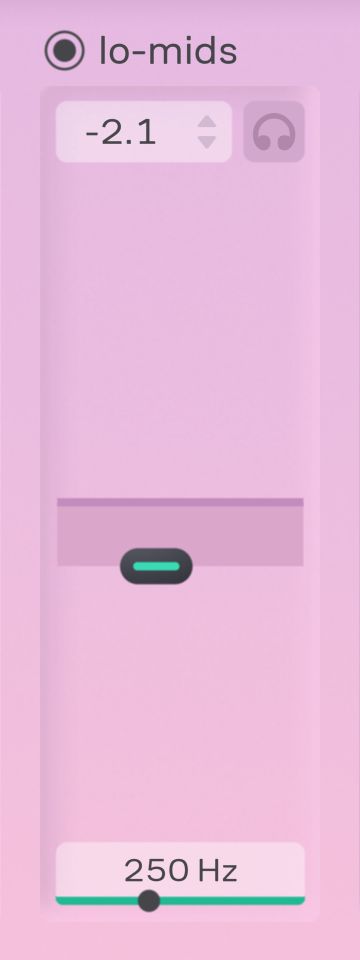
Tone level

Adjust the tone level for the band by dragging the value box, or by double-clicking and typing the value. The value is not expressed in dB, it’s rather a reference value. Tone levels are scaled to have more fine control in the values near the center to allow for more precise adjustments. This value can also be adjusted by using the tone control handle.
Band listen
Listen to the frequency area most affected by the tone control by clicking on the listen icon. Band listen selection is exclusive.
You can also activate band listen by holding the ⎇ Option key on macOS or Alt key on Windows and clicking or dragging on the tone control handle.
Tone control
Controls the tone emphasis in a given frequency area. Moving the tone control handle up/down adjusts the level of the band. This changes the shape of the overall tone. Emphasizing an area (i.e., lows, lo-mids etc.) guides the processing to emphasize that frequency area, and vice versa. It can be also thought of as an offset level for the processing. I.e., adjust the corrections made by Bloom to suit your taste.
Boosting a tone control area causes more boosting in that frequency area. Cutting in a tone control area causes more cutting to occur in that frequency area.
Adjust the tone area center frequency of the band by moving the handle left/right. The center frequency is not an exact value, but serves as a reference point, as all the tone control areas affect the whole frequency area.
Hold the ⌘ Cmd key on macOS or the Ctrl key on Windows while dragging the tone control to lock the gain value and only adjust the center frequency.
Hold the ⎇ Option on macOS or the Alt key on Windows and click or drag to activate the band listen mode for the current band.
Tone frequency control

Set the center frequency for the band by dragging the value left/right, or by double-clicking and typing the value. The tone frequency control value is not the exact center frequency and serves only as a reference point. Each tone control band can affect the whole processing range, while they affect most of the frequency area indicated by the center frequency.
Note that Bloom automatically compensates for changes made in one frequency area by adjusting others. This means that adjusting tone control parameters in one frequency area can affect the processing in other areas.
6. Quality selector

Use the quality selector to select the quality mode between “normal”, “high”, or “low latency”. Changing the quality mode affects the phase response and time resolution of the processing. The dynamic filter curves that Bloom applies are mixed-phase when the quality mode is set to “normal” or “high”. In “low latency” quality mode the filter curve is minimum-phase.
The mixed-phase response is shape-adaptive. This way, all generated broad EQ shapes are close to linear phase, and more detailed strokes are close to the minimum-phase response. This approach aims for a good balance between minimal pre-ring and parallel summing behavior. The post-mix high and low cut output filters are always minimum-phase.
The “normal” mode is best for most use cases. It balances quality, latency and CPU usage to an optimal level. In normal quality mode, the filter response has mixed-phase characteristics.
The “high” mode improves the quality of the processing by increasing the resolution for the analysis. This is useful for complex material, such as grand piano or bus/main tracks.
The “low latency” mode minimizes the latency of the processing, which allows Bloom to be used even for tracking purposes. Due to the lack of the lookahead in low latency mode, the transient response is different compared to the other modes. Exact latency values in low latency mode at different sample rates can be seen in the table below.
Latency in low latency mode
| Sample rate (kHz) | Latency (samples) | Latency (ms) |
|---|---|---|
| 44.1 | 64 | 1.45 |
| 48 | 64 | 1.33 |
| 88.2 | 256 | 2.90 |
| 96 | 256 | 2.67 |
| 192 | 448 | 2.33 |
Note that both “high” and “low latency” quality modes will increase the CPU load compared to normal mode.
7. Stereo section
The stereo section controls how the stereo channels are processed.
Stereo mode selection
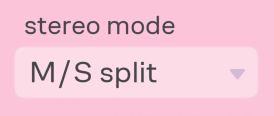
By default, the stereo mode is set to “linked”. This means that the stereo channels are analyzed together and processed in the same way.
In the “M/S split” mode the mid and side channels are processed separately. In the “L/R split” mode the left and right channels are processed separately.
Selecting a split mode opens the stereo controls.
Stereo controls

When selecting a split stereo mode, the stereo controls open. With them, you can control how the stereo channels are analyzed and how the processing is applied to the channels.
In split mode, the tone controls can also be controlled separately using the stereo tone controls.
Stereo tone controls
The tone control values can be adjusted separately in the L/R and M/S split modes. Drag the individual tone control handles (L/R or M/S) to adjust their values for each stereo channel. This way, you can for example emphasize the highs on the side channels while de-emphasizing them in the mid channel.
Click on the link icon to adjust both mid and side target curve values at the same time, while keeping their relative values.
Link

Use link to adjust how the stereo channels are analyzed. With the value at 0%, the channels are analyzed separately. With the value at 100%, the channels are summed and analyzed together.
Active stereo channel
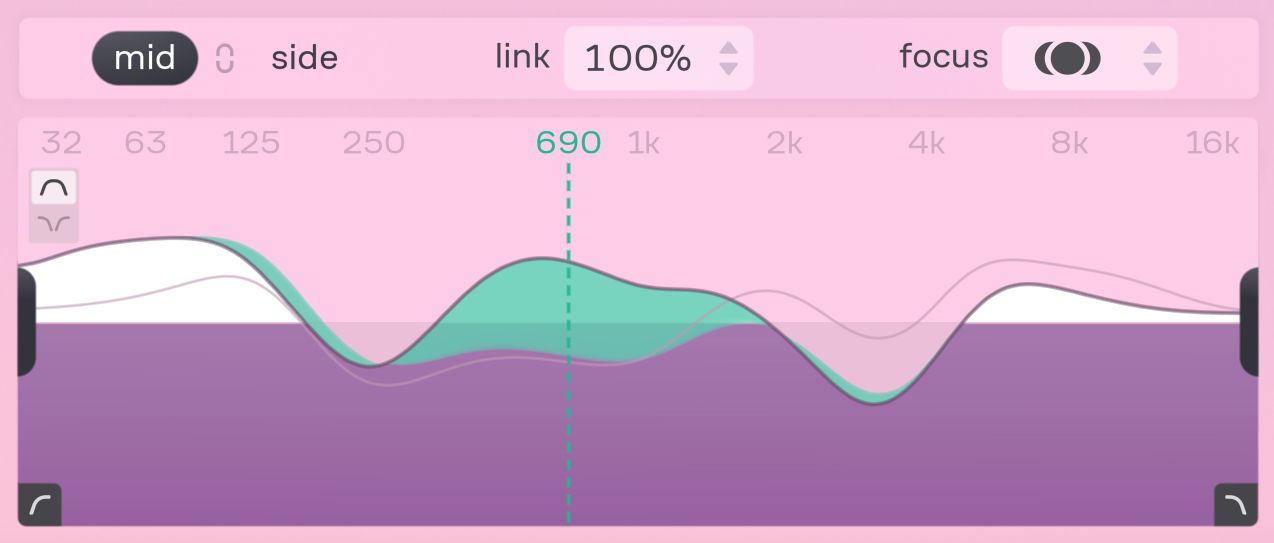
Choose the stereo channel shown on the processing graph by clicking on the stereo channel name. For example, click on “mid” to see how the mid stereo channel is being processed in the processing graph.
In the picture above the mid stereo channel is chosen as the active stereo channel. All the colored areas shown in the processing graph are the corrections made to the mid channel by the lo-mids tone control.
Focus

Focus controls the amount of processing that is applied to each of the stereo channels: it “focuses” the processing on either of the stereo channels. For example, when the focus is at “mid 100, side 50”, the processing is applied fully to the mid channel, and only partially to the side channel.
8. Output and calibration

The output and calibration section contains controls for squash sensitivity calibration and different aspects of what happens to the signal after the processing.
Squash cal
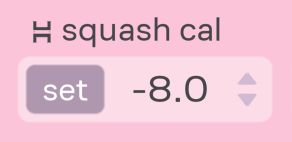
Use squash cal to adjust the squash gain-staging, i.e. how “hot” the signal will go to the squash range. It can also be thought of as an inverse threshold, or sensitivity for the squash range.
This helps in adjusting the appropriate squash level for any signal level. The squash cal value is expressed in decibels (dB). Use lower values with high input levels whereas higher values are better with low input levels.
Click or click and hold “set” to find the optimal value for squash cal based on the input level (LUFS).
Wet trim
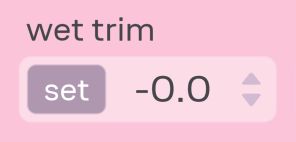
Use wet trim to adjust the processed signal level before mix. You can compensate for the changes in gain caused by the processing.
Click or click and hold “set” to match the short-term input/output difference (LUFS). This helps you set the wet trim for output compensation easily.
Mix
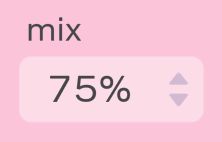
Mix controls the wet/dry balance of the signal for the output. When at 0%, only the dry (unprocessed) input signal is output. When at 100%, only the wet (processed) signal is output.
Output
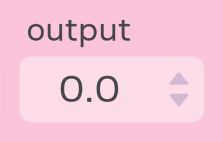
Output is the output gain. Use it to adjust the output signal level after mix. This can be useful as a generic utility for simple gain-staging.
9. Toolbar

Undo/redo

Press the undo button to undo the last change made with Bloom’s user interface. Click on redo to redo a previously undone change. There are a predetermined maximum number of undo steps exclusive to both A and B states.
Note: If you’re using Logic Pro, please only use the undo/redo system of Bloom. Using Logic’s built-in one might yield unexpected results, especially when used together with A/B states.
Comparing settings with A/B switching

Two different sets of parameter settings can be saved using the A/B switch. Just select either A or B and adjust the parameter settings you want to compare and do the same to the other set. Compare the parameters by using the A/B selector to toggle between the states.
Use the A/B copy button to replace the other parameter settings with a copy of the current ones.
Sidechain

You can route an external sidechain input into Bloom and use it as the input for the analysis. Click the headphones icon to listen to the external sidechain input. Sidechain is only in use when the “SC” button is active. The details on routing an external sidechain key signal to a plug-in depend on the DAW you are using.
When the sidechain key signal is routed to Bloom and the sidechain is enabled, the processing applied to the signal is based on the sidechained signal. The sidechain can be especially useful for stem bouncing.
Preset menu

Bloom comes with a selection of factory presets. Click the current preset’s name on the toolbar to open the preset menu.
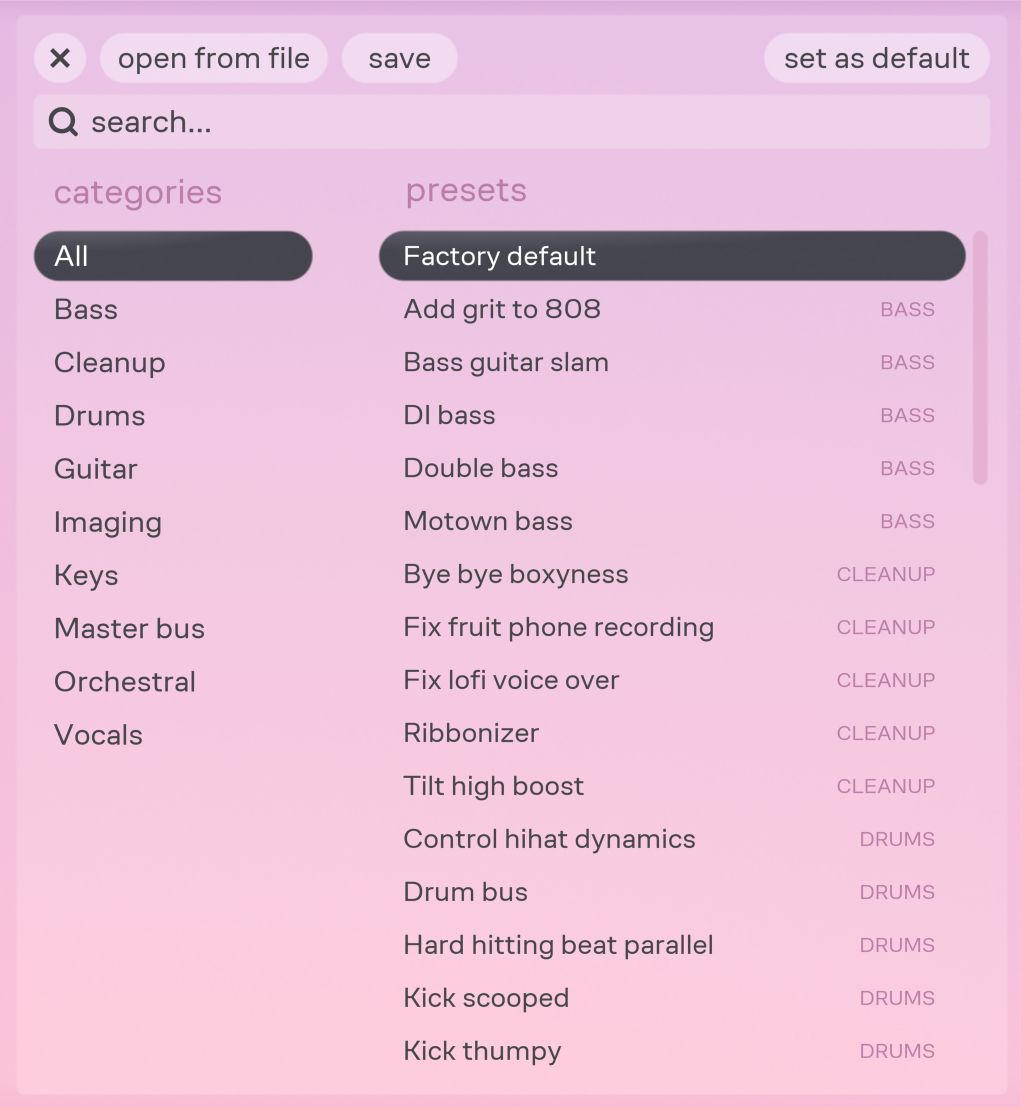
In the preset menu, there is an additional category for your own presets. Clicking on a preset instantly loads it. Navigate to the next and previous preset using the arrow buttons in the toolbar.
Clicking the “X” button in the preset menu or clicking outside the menu closes it.
Please note that for compatibility reasons, Bloom doesn’t reveal its presets to the host’s native preset menu in some DAWs.
Searching presets

Presets can be searched either by name or by tags. The factory presets have tags that describe their use cases.
Loading presets
Presets can be loaded from the preset menu by clicking on a preset or by navigating using the arrow buttons. The preset menu only displays factory presets and presets in the user’s preset folder. Presets can also be loaded from any other location on your computer by clicking on the “Open from file” button at the top of the menu.
Saving presets and adding tags
Save presets by opening the preset menu and clicking “Save.” This will let you choose a location and a name for the preset to save. Use the default location for Bloom to find your presets.
Set your default starting point
Click on the “Set as default” button to use the current preset as the initial preset instead of the factory default preset. In Pro Tools, please instead use its built-in “User Default” feature.
Deleting presets
Presets can be deleted by clicking on the trash can symbol (visible by hovering) next to the preset’s name and confirming. Alternatively, you can use a file explorer and navigate to the default location of the user presets and remove the files.
Importing presets
The presets are saved as .preset files in the default user preset location (see the section describing paths). All Bloom presets work on both macOS and Windows and can be shared between users by putting the files into the default user preset location.
Config menu
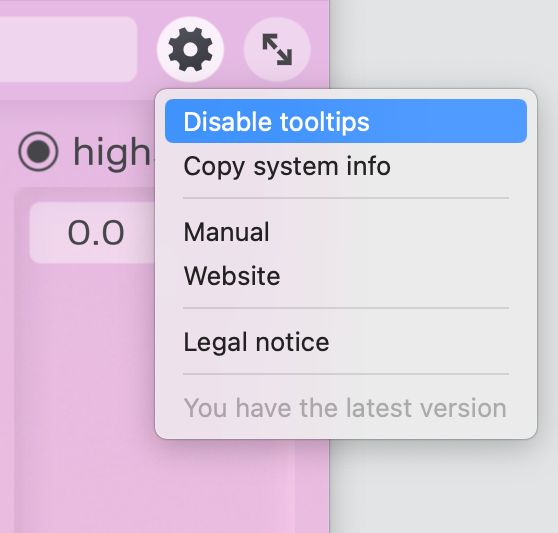
Click on the cogwheel icon at the right end of the toolbar to access the config menu. From this menu, multiple settings can be configured, affecting all instances of Bloom. The different settings are explained in detail below.
Disable tooltips
Tooltips are displayed on the bottom left corner by default. Activate a tooltip by hovering over a parameter with your mouse to see relevant information about the parameter in question. Turn off this function by clicking on the “Disable tooltip” option.
Copy system info
Copy information about your system to the clipboard. You can add this information to bug reports or other support emails.
Manual
Opens a PDF version of the Bloom manual.
Website
Opens Bloom’s web page (https://oeksound.com/bloom).
Legal notice
Opens a text file containing the legal notice concerning Bloom.
Window resize menu
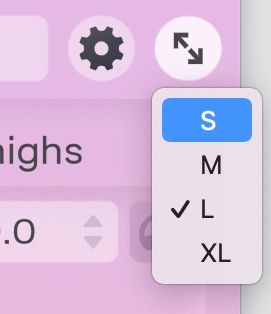
Change the size of the user interface by clicking on the resize icon, and selecting the size from the dropdown menu. The sizes range from small (S) to extra large (XL). If the selected interface size can’t fit your screen resolution, the size selection is not applied.
10. Miscellaneous
Bloom automatically checks for new plug-in versions in the background.
When a new version is available, an circle mark will be displayed on the configuration menu button. Information about a possible update is shown at the bottom of the config menu.
Updates are provided for good reasons, such as bug fixes and performance improvements. We always ensure that presets are backward compatible with all Bloom versions to come. We take great care to ensure that things don’t break between updates.
11. Paths for presets and uninstallation
macOS
User presets:
/Users/<username>/Documents/oeksound/bloom/Presets
Configuration file:
/Library/Application Support/oeksound/bloom/config.xml
The macOS uninstaller can be downloaded separately from our downloads page: https://oeksound.com/downloads/#uninstaller.
Windows
User presets:C:\Users\<username>\Documents\oeksound\bloom\Presets
Configuration file:C:\ProgramData\oeksound\bloom\config.xml
Please use the “Add or Remove Programs” -function (or similar) to uninstall Bloom.
FAQ and support
You can find our FAQ section on our website: https://oeksound.com/support
If our FAQ doesn’t answer your question, or if you find a bug, don’t hesitate to email us at: support@oeksound.com
Copyright oeksound Ltd 2024. All rights reserved.
 VST is a trademark and software of Steinberg Media Technologies GmbH.