soothe live user manual
- 1. Introduction
- 1.1 Quick Start
- 1.2 Technical Specifications
- 1.3 Installing Soothe Live
- 1.4 Processing
- 2. Sensitivity Curve and the Reduction Graph
- 2.1 Band Controls
- 2.2 Touch Screen Gestures
- 3. Parameters
- 3.1 Main Section
- 3.2 Sidechain
- 4. Output Section
- 5. Toolbar
- 6. Presets
- 7. Miscellaneous
- 7.1 Stereo processing
- 7.2 FAQ and Support
- Appendix A: Technical Specification Charts
- Appendix B: Control Surface Layout
1. Introduction
Thank you for choosing Soothe Live!
Soothe Live is an adaptation of oeksound Soothe2 for Avid VENUE S6L and Fourier Audio transform.engine platforms, specifically designed for live sound environments. Please note that support for Pro Tools HDX has been discontinued.
Soothe Live is a dynamic resonance suppressor similar to our plug-in, Soothe2. It automatically detects resonances and energy build-ups across the audible frequency range and applies suitable reduction.
Soothe Live can be used to treat a myriad of problems typical in the live sound environment. It has uses both on individual channels and busses to combat resonances and uneven tonal balance resulting from close-miking and summation.
It’s recommended you read through the manual to understand all the details on Soothe Live. If you want to get started quickly:
- Use the Getting Started guide located in the toolbar of the Soothe Live plug-in
- Watch our Soothe Live Quick start and Overview videos
- Read the Quick start guide below
1.1 Quick Start
- Start with the factory default setting and turn up the depth until you hear Soothe Live attenuating too much. Then back off a little.
- Use the nodes on the frequency graph to focus the processing. Boost a frequency area that has resonances you want to cut.
- Adjust the detail parameter to suit the material – broad detail for general tonal control and fine detail for dealing with complex sound sources.
- Set speed according to the sound source. The higher the speed value, the slower the attack and release.
- Adjust the depth again if necessary.
- Use bypass for A/B comparison.
1.2 Technical Specifications
Soothe Live supports sample rates of 96 kHz, 88.2 kHz, 48 kHz, and 44.1 kHz. Using different sample rates doesn’t produce identical results due to technical implementation differences; however, psychoacoustically, they are similar enough. Soothe Live introduces a roundtrip latency of 95 samples when used with the VENUE S6L system. The algorithmic latency is 64 samples on both platforms. A detailed breakdown of the latencies in different sample rates can be found in the section Technical Specification Charts.
On VENUE S6L a single HDX DSP core can run three mono or two stereo instances of Soothe Live. A typical HDX card contains 18 DSP cores and can run 54 mono or 36 stereo Soothe Live instances. Sharing DSP cores with other plug-ins is disabled. Soothe Live mono and stereo instances are separate implementations and cannot share a DSP core.
Fourier Audio transform.engine can run up to 78 instances (13 per core) of Soothe Live on 96kHz sample rate and the smallest available period size (32). Using lower sample rates and longer period sizes allows for more instances. There’s no difference in resource consumption between mono and stereo instances.
1.3 Installing Soothe Live
Avid VENUE S6L

- Download the latest Soothe Live installer from our download page.
- Unzip the Soothe Live installer.
- Copy the AAX Plug-Ins folder in its totality to the root of the USB drive, as shown in the picture above.
- Insert your iLok and the USB drive into the VENUE system.
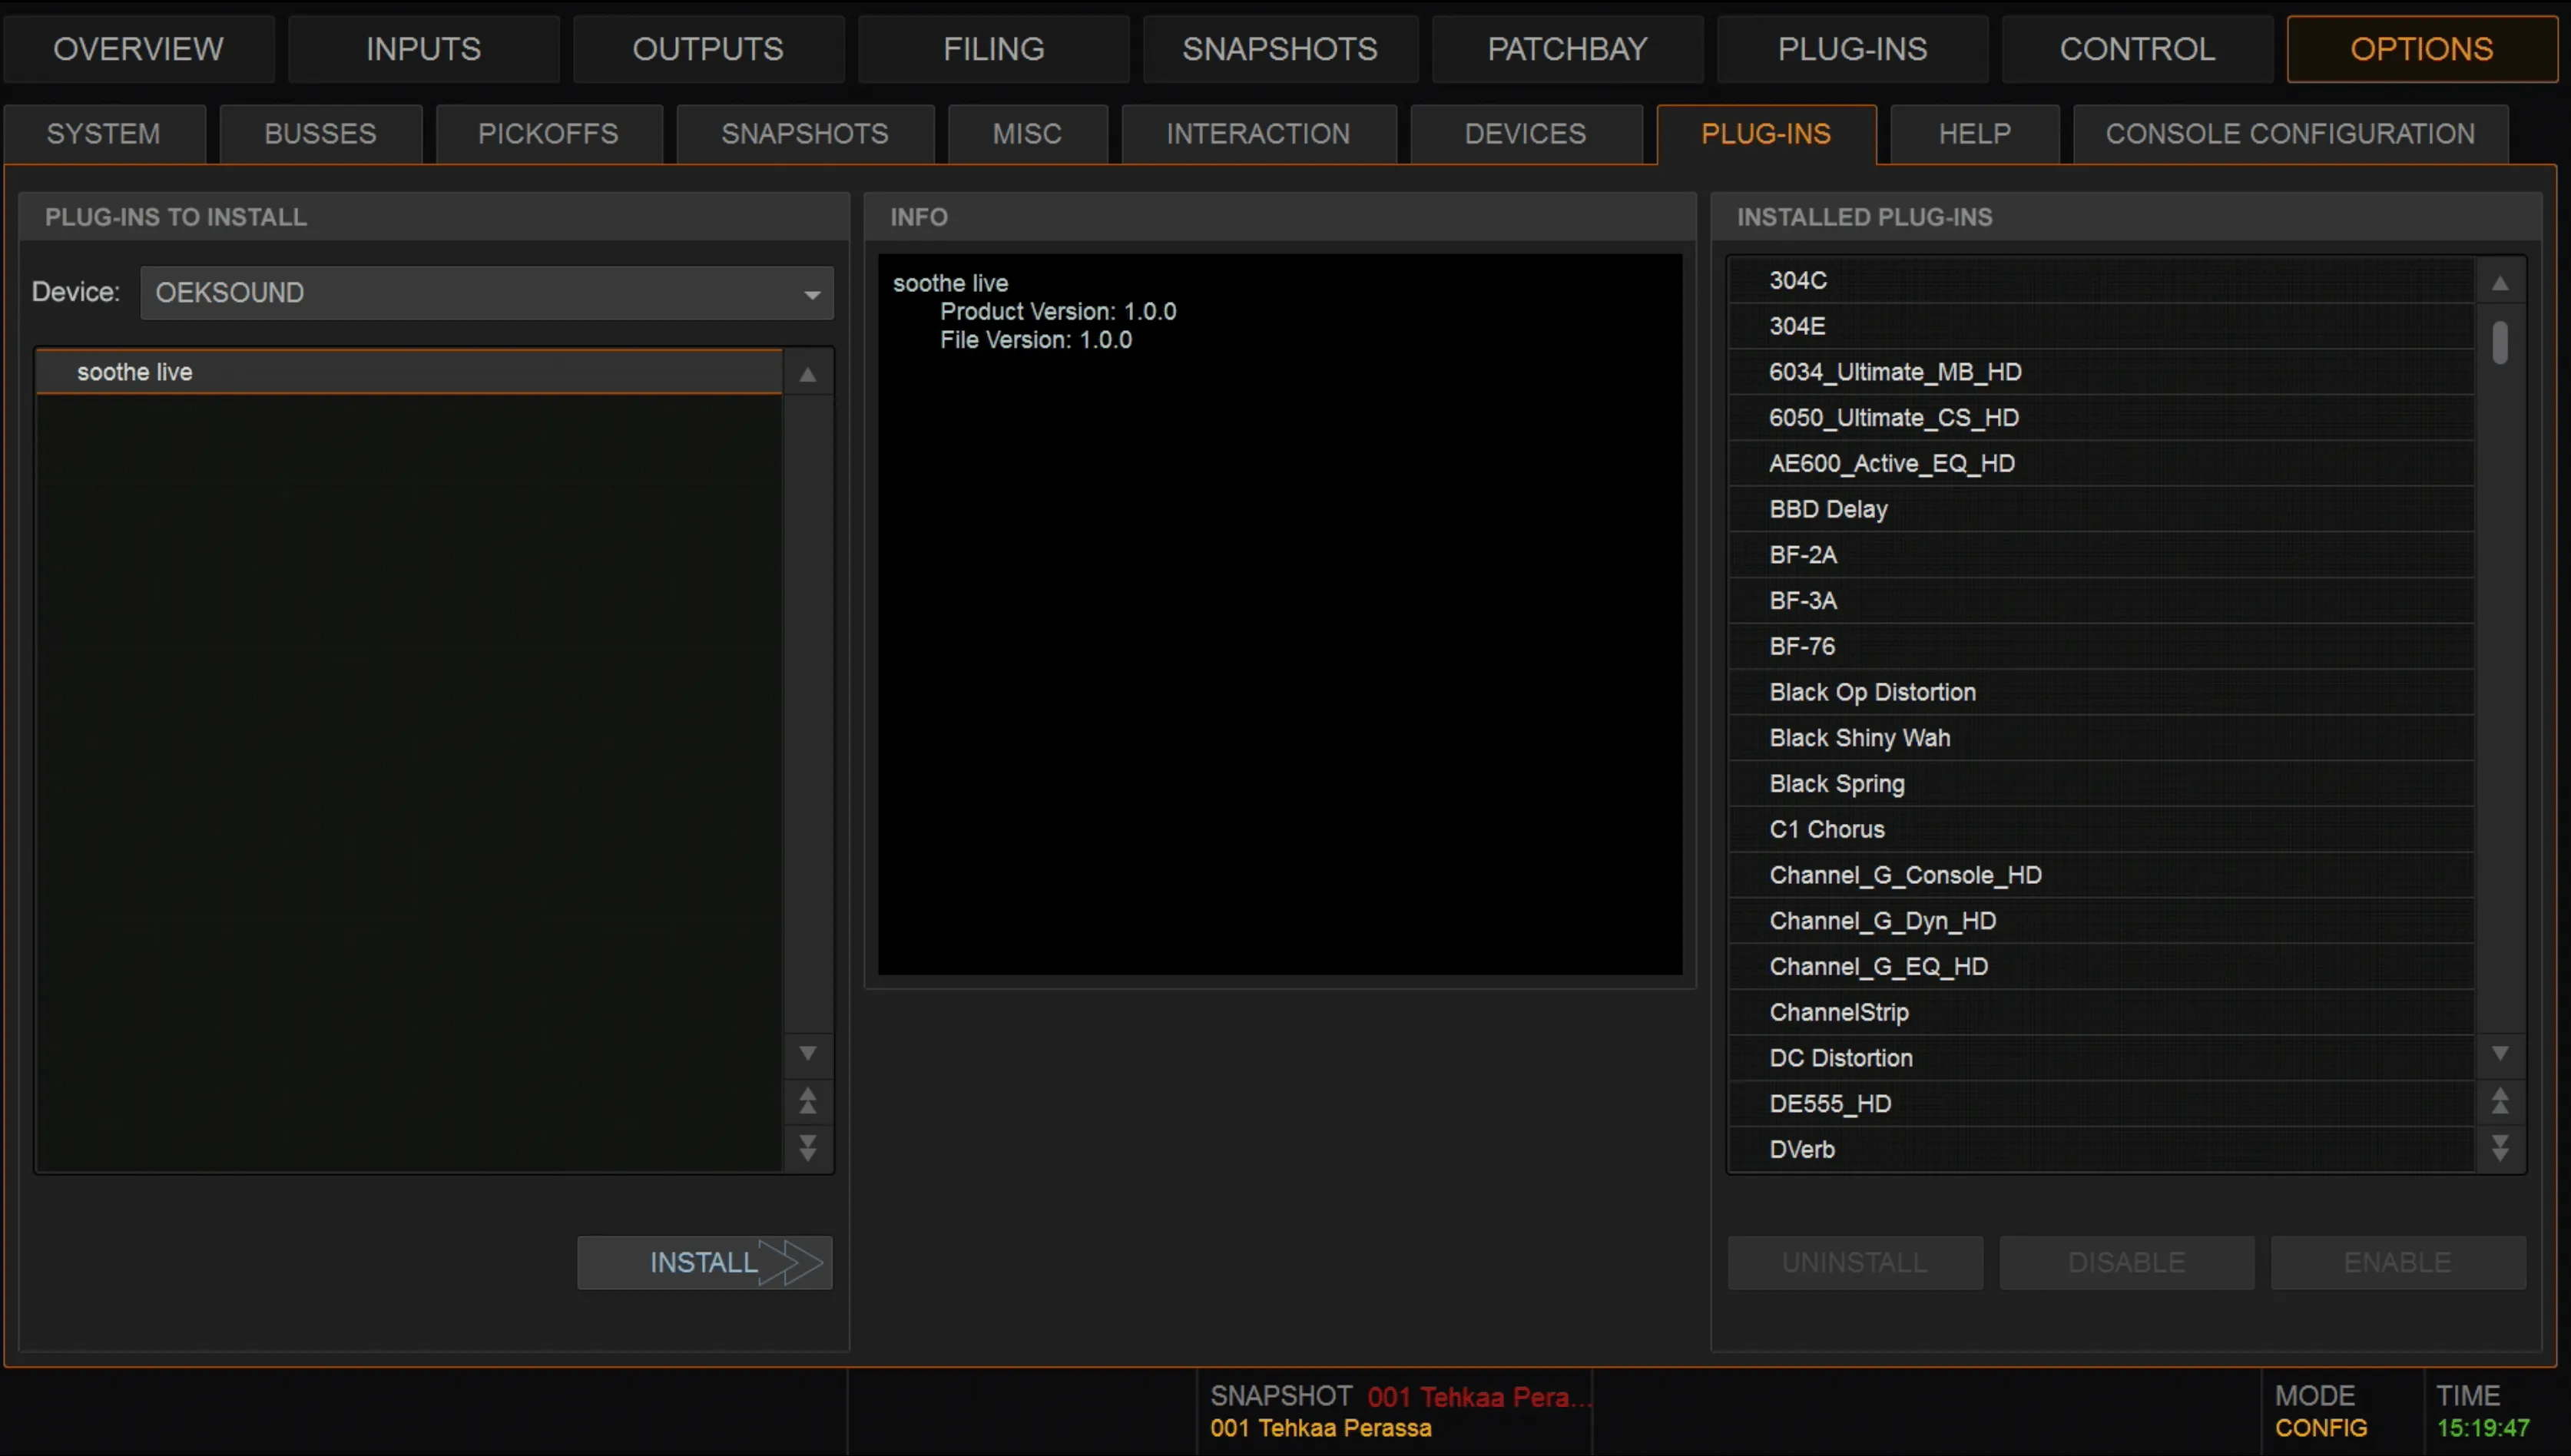
- Switch the VENUE S6L system to the CONFIG mode.
- Go to the OPTIONS page and select the Plug-Ins tab.
- Select Soothe Live plug-in from the “Plug-Ins to Install” page and click INSTALL.
- When installed Soothe Live is ready for use.
Fourier Audio transform.engine
When using Soothe Live as part of transform.suite subscription, the plugin is automatically installed along with the suite.
If using a separately bought license, please follow these steps to install Soothe Live:
- Ensure that the Soothe Live license is activated on your iLok dongle and that the dongle is connected to a USB port on the transform.engine.
- After completing the Accessing Windows steps, you are ready to install plugins.
- On your personal device, download the Soothe Live installer from our download page.
- Copy the installer file to a USB stick.
- Insert the USB stick into any available port on the transform.engine.
- In the Windows search bar, type “This PC”, select the This PC app, and press Enter.
- Locate your USB stick in the window and find the Soothe Live installer file.
- Run the Soothe Live installer (.exe file).
- Closing the plugin host window will begin the plugin rescan process. Make sure that the iLok dongle is connected to a USB port during this process.
Both the VENUE S6L and transform.engine require you to keep the iLok dongle connected when running Soothe Live. Note that the transform.engine includes four USB ports in a protected bay on the back of the device to securely attach your iLok dongle.
1.4 Processing
Soothe Live recognizes resonant frequencies and compares them to the neighboring frequency areas. It takes into account the overall level of the resonances making it more level-dependent than Soothe2. This means Soothe Live can also be used to control dynamics much the same way as using a multiband compressor. The level-dependency is a designed feature as live performances usually have a wider range of dynamics. The increased level dependence helps to even out the dynamics.
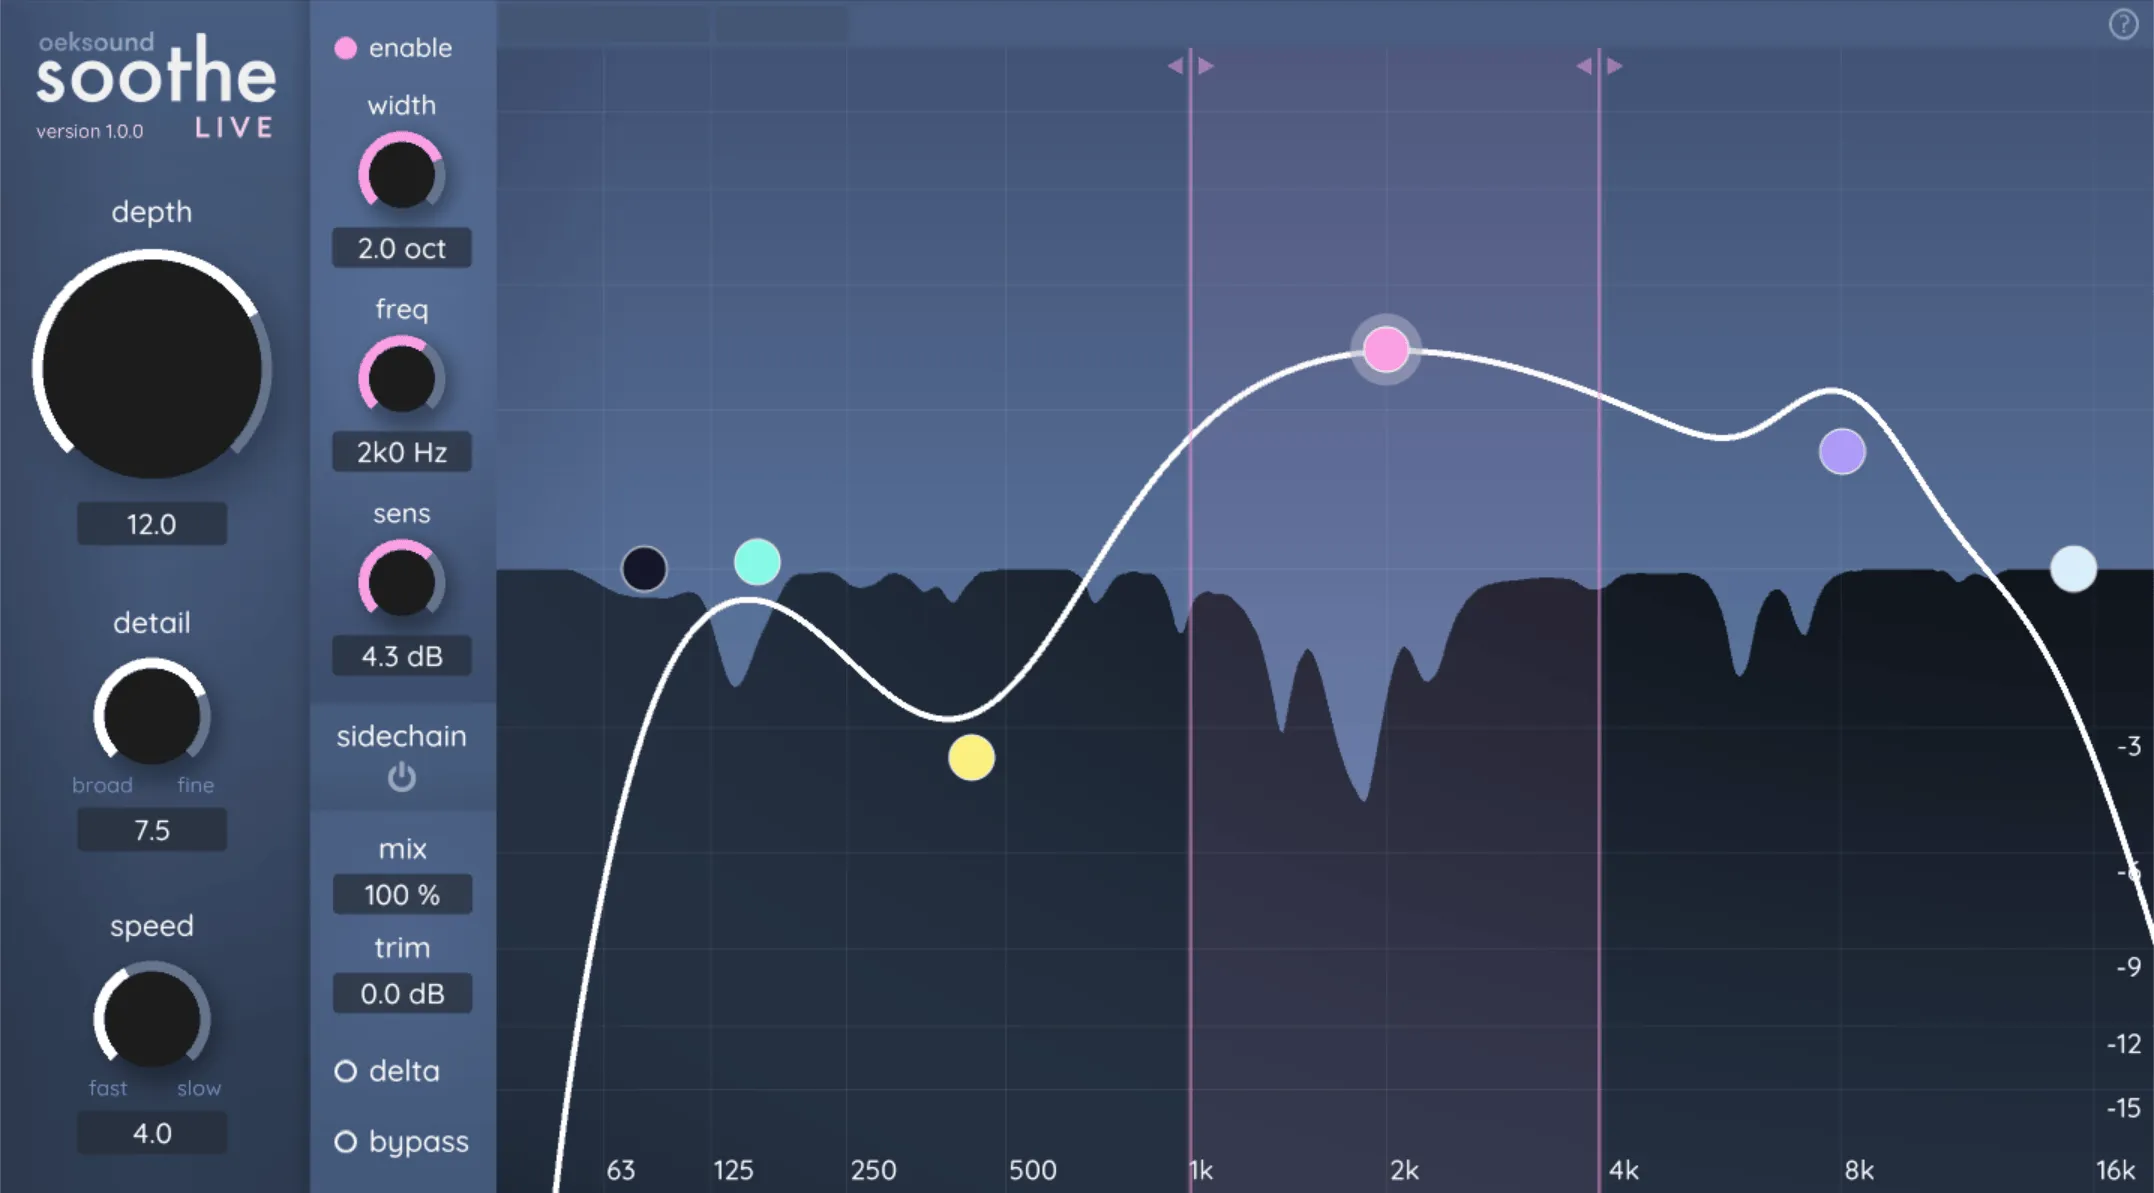
2. Sensitivity Curve and the Reduction Graph

Soothe Live features a real-time graph showing the parts of the signal being processed. The reduction range in decibels is shown on the right-hand side of the frequency graph.
Use the nodes to adjust the sensitivity curve. Boosting a frequency area results in more reduction in that area and vice versa. Soothe Live features 6 bands: high and low cut filters and four bell bands. Different band types, such as shelving filters, are not featured to keep things simple. Each band is controlled by a colored node on the frequency graph.
While the sensitivity curve is made to look like an EQ curve for familiarity’s sake, it is actually a frequency-based weighting curve for the processing. You can think of this as the typical process of notching out unwanted frequencies:
- Take an EQ and boost different frequency areas to find an unwanted frequency.
- Only with Soothe Live, you don’t turn the boost into a cut.
You can adjust the band parameters by dragging a node using a mouse or the touch screen. With the touch screen, the parameters can be adjusted faster using several different touch screen gestures. A run-through of these can be found in the section Touch Screen Gestures. All band parameters can also be adjusted using the band parameters in the band controls.
2.1 Band Controls
The band parameters can be adjusted using the knobs in the band controls.
Toggle enable to disable/enable a band. When disabled, the band is not affecting the sensitivity curve.
Width controls the band’s bandwidth (or q).
Freq controls the band’s center frequency.
Sens or band sensitivity controls the amount of reduction in a band. Higher values result in more sensitive processing in the frequency band, resulting in more reduction.
2.2 Touch Screen Gestures
Soothe Live has multiple touch screen gestures designed to speed up the setup process.
Use two fingers to drag any knob or node to fine-adjust its parameters.
Double-tap a node to enable/disable a band.
Double-tap a knob to return it to its default value.
Drag a node using two fingers up or down to adjust the q of the band. Or you can use the pinch gesture by dragging two fingers away or nearer to each other sideways.
Use three fingers to drag a node up or down to lock its frequency. This is useful when you have found a frequency in which you want to reduce resonances – you can then adjust the amount of reduction while locking the frequency with this gesture.
3. Parameters
3.1 Main Section

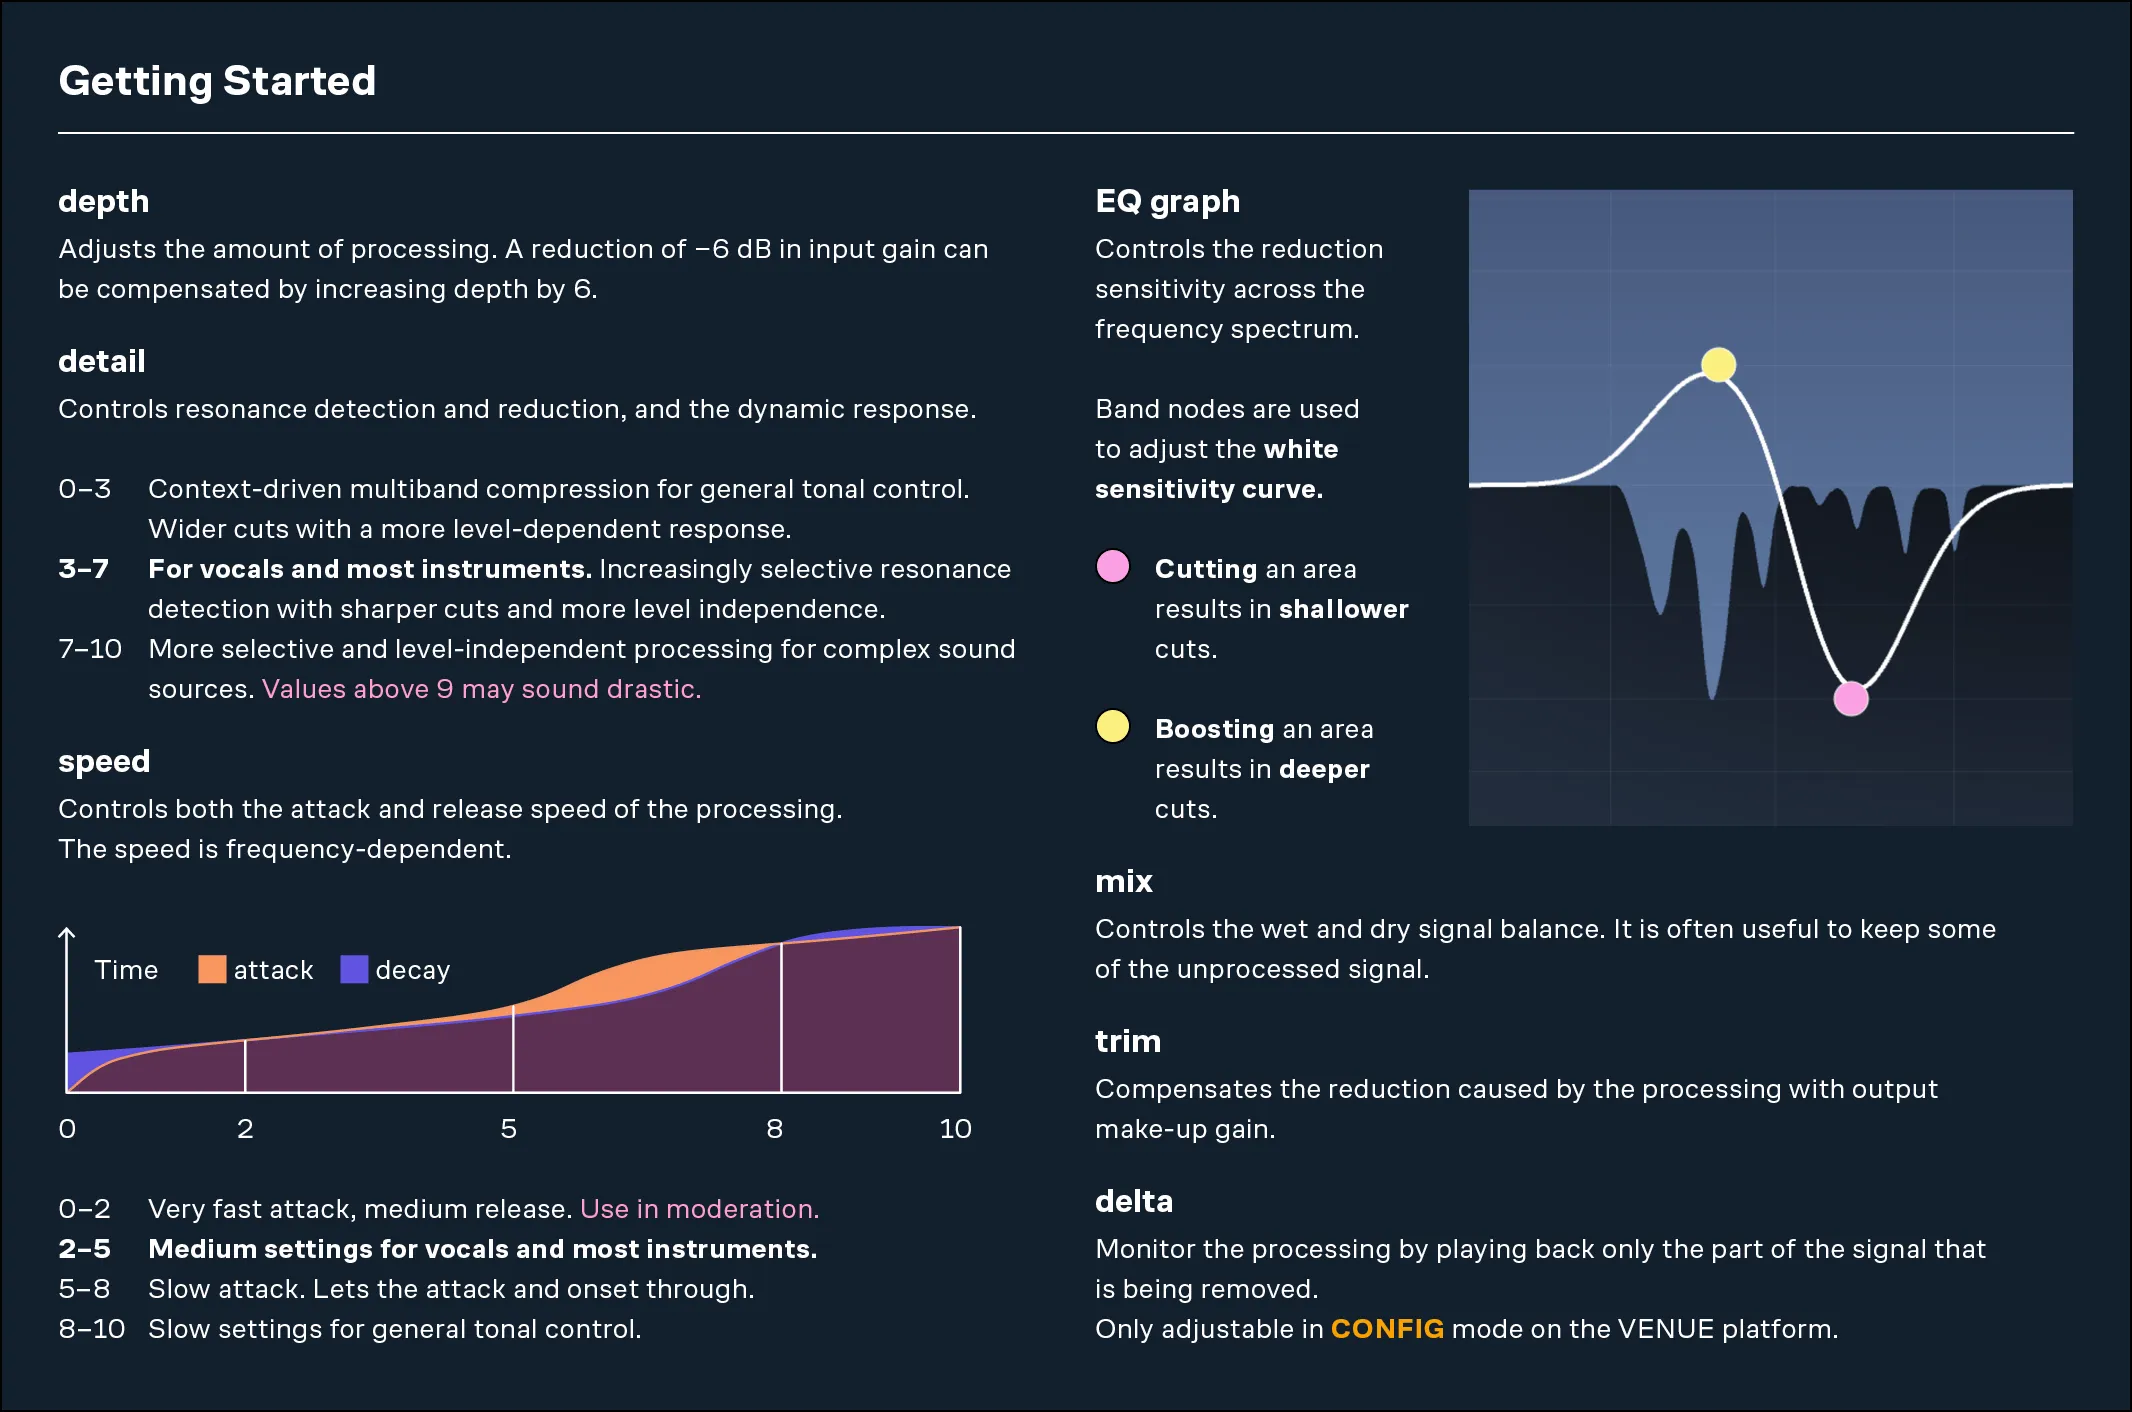
Depth determines how much processing is applied. Higher depth values result in more reduction. You can think of it as the main sensitivity or threshold for the processing, although the threshold isn’t set at any fixed input level. Soothe Live is level dependent, so always adjust depth according to the input source, even when using presets.
In moderate settings, when reduction is roughly up to 9 dB, changes in input gain can be compensated using depth to achieve the same amount of reduction. For example, if you need to adjust a channel’s input gain down by 6 dB, you can achieve the same amount of reduction as earlier by raising the depth up by 6 dB.
Detail controls resonance detection and reduction, and the dynamic response. It adjusts multiple factors under the hood to combine the most useful combinations of settings. At its endpoints are broad and fine. Higher values result in more level-independent and transparent processing, with sharper cuts and more selective resonance detection. A good overall detail setting range for vocals and most instruments is from 3–7.

In the broad detail range (0–3), Soothe Live acts like a multiband compressor driven by the input’s common spectral trend. This range also results in more level dependent processing. It can be used to even out the tonal and dynamic imbalances in input, group, or master channels. The broad detail range differs from Soothe2’s a lot by design and is implemented to provide a good overall multiband compressor for live mixing.
By increasing detail, Soothe Live becomes increasingly transparent with narrower cuts. The resonance detection is also more selective, cutting only the most prominent resonances. Fine detail range (7–10) results in increasingly level-independent processing. These settings are useful for drum overheads, string and wind instruments, or anything with prominent, static spot frequencies.
Note that an overly high detail value can cause artifacts if the source material doesn’t have sharp resonances. This can be heard especially on vocal tracks.
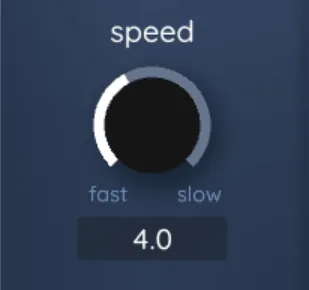
Speed controls both the attack and release of the processing. Speed is frequency-dependent, being faster with higher frequencies in general. Fast speed is good for processing percussive elements and onsets, and slow speed for general tonal control. A speed range at around 2–5 generally works well for vocals and most instruments.
The attack and release speeds change with the speed values according to the graph below:
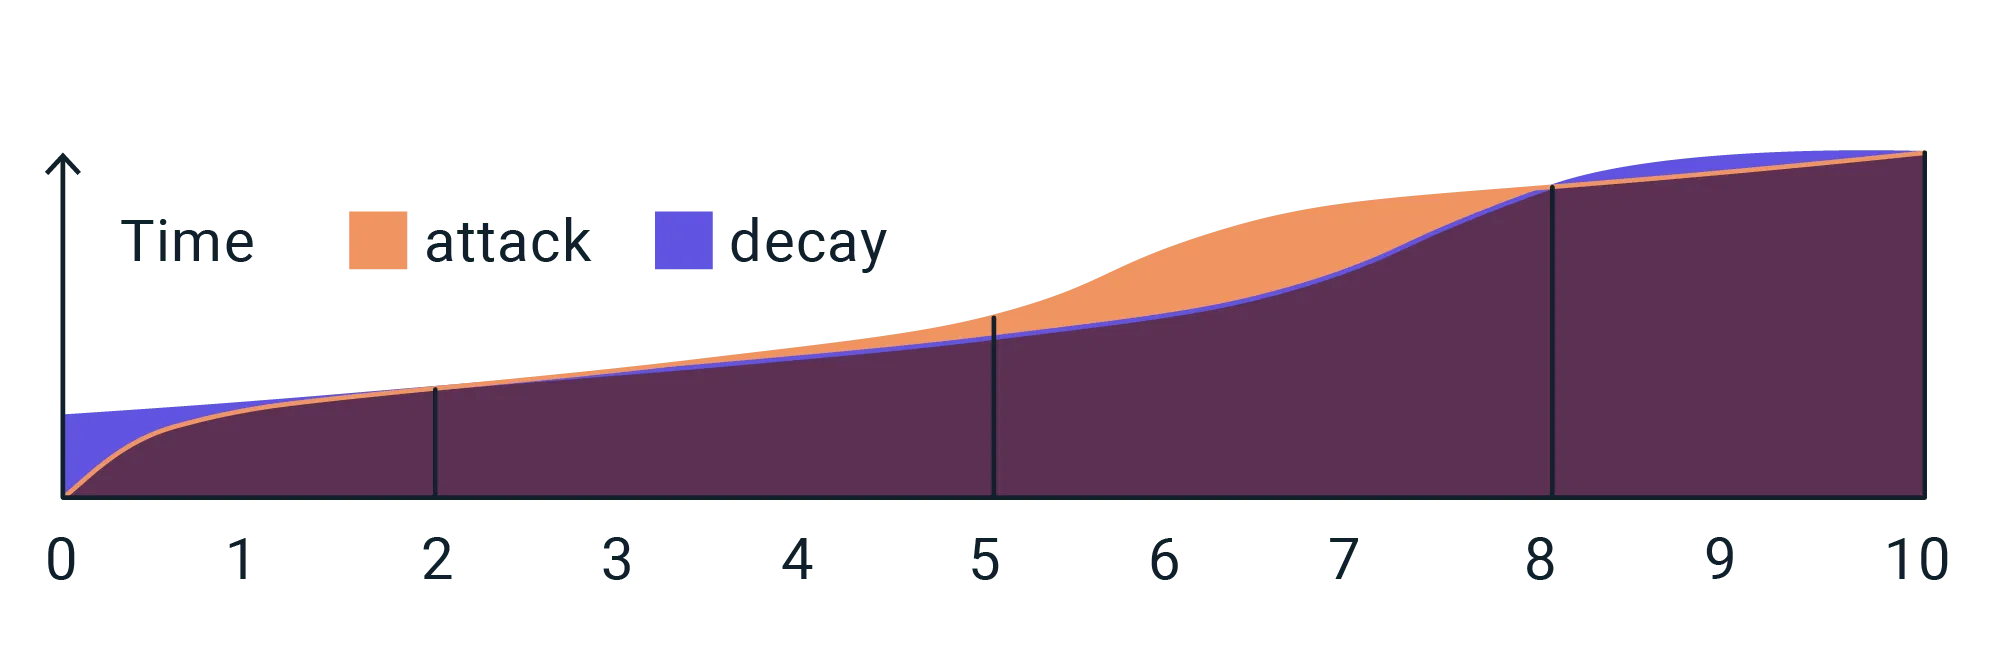
The fast speed range (0–2) results in a very fast attack and a fast release, which is good for controlling the onset in hi-hat and other cymbals, brass, and guitar instrument transients. This range can also be used to the same effect as parallel compression on vocals when blended in using the mix control.
In the moderate speed range (2–5), the attack and release times are similar in length. This range is generally useful for processing vocals and most instruments.
In the speed range 5–8, the attack starts to slow down rapidly, letting the onset through. This has multiple applications where you want to preserve the onset while simultaneously reducing unwanted resonances. This is useful for example in a slap bass guitar, some keyboard and percussive instruments, or for cutting an overly resonant ride bell from the overhead channels.
The slow speed range (8–10) results in slow attack and release speeds. It works for overall harshness removal and general tonal control, making it an especially useful setting for processing groups and master channels.
3.2 Sidechain

The plug-in accepts an external sidechain key input. With the sidechain enabled, the resonances are detected according to the key signal, and the resulting reduction is applied to the input signal.
The sidechain function can be used, for example, for controlling hi-hat bleed in a snare channel, carving out space vocals in an instrument bus, using the kick drum to duck synths or backing tracks, or controlling the reverb by sidechaining it with the vocal input.
Select a key input to use an external sidechain input for resonance detection. Here are the steps on how to select a key input in the VENUE S6L consoles and use it as an external sidechain input:
- Go to the plug-ins window and select the Soothe Live instance you wish to use the sidechain input.
- Click on the KEY SOURCE dropdown menu located on top of the plug-in.
- Select the key input from the dropdown menu.
- Click on the
 sidechain on/off icon to activate the sidechain processing.
The key input has to be a mono input. When the input is selected, press the ![]() sidechain on/off icon to activate the sidechain processing. Note that on VENUE S6L you can only adjust the key input in CONFIG mode. Recalls and snapshots follow their saved sidechain input state.
sidechain on/off icon to activate the sidechain processing. Note that on VENUE S6L you can only adjust the key input in CONFIG mode. Recalls and snapshots follow their saved sidechain input state.
4. Output Section
The output section lets you adjust monitoring and levels.
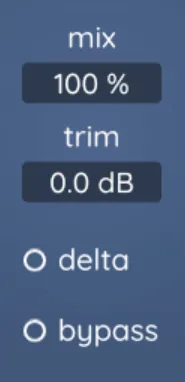
Mix combines the original dry signal with the processed output. With the mix at 100%, only the processed signal goes to the output, and when at 0%, only the dry signal goes to the output.
It’s sometimes a good idea to drive the processing a bit hot at first and then lower the mix to add some dry signal to achieve a more transparent sound. The maximum reduction range is shown while the mix parameter is being adjusted. The frequency graph also compensates for the changes in the mix value and shows only the actual reduction. This helps to assess the resulting reduction visually.
Trim is the make-up gain to compensate for the gain reduction caused by the processing. This is why it only has positive values. Trim is the output compensation gain. By default, the trim value is set to 1.0 dB to compensate for the typical gain reduction caused by the default preset.
Delta lets you monitor the difference between the wet and dry signals. This is essentially all the resonances Soothe Live is cutting. Using delta is useful in finding resonances faster in virtual sound checks or in-ear monitor mixing.
Note that on VENUE S6L delta can only be toggled in CONFIG mode. Recalls and snapshots follow the saved delta state. Delta is not adjustable from the physical console surface by design to prevent accidental activation.
Bypass is a soft bypass for a click-free A/B comparison. This does not bypass the underlying processing in the background and Soothe Live continues to compute the output. To free up DSP resources, the plug-in has to be removed from the plug-in rack’s insert slot. The bypass state is saved in snapshots and presets.
5. Toolbar
The toolbar shows the currently selected parameter’s name, value, and a short tooltip. Click on the ![]() help icon on the right-hand corner of the toolbar to access the “Getting Started” guide. This gives you a quick overview of the parameter ranges along with some helpful pointers on using the plug-in.
help icon on the right-hand corner of the toolbar to access the “Getting Started” guide. This gives you a quick overview of the parameter ranges along with some helpful pointers on using the plug-in.
6. Presets
Soothe Live comes with several presets for the most common use cases. The factory default preset is designed to be a good starting point for most cases and is far from flat. It’s optimized for vocals and monophonic instruments.
Presets can be accessed in the VENUE S6L system via the console plug-in menu.
To load a preset in the VENUE S6L system:
- Go to the plug-ins page and select a Soothe Live instance you want to load a preset.
- Click on the preset folder icon.
- Select a preset you want to use.
- To load a preset, double tap the preset name on the list.
Saving your own Soothe Live presets in the VENUE S6L system:
- Select a Soothe Live instance.
- Adjust the plug-in parameters as desired.
- Click the preset folder icon.
- Select “New.”
- Enter a custom name for the preset.
Renaming presets:
- Select a Soothe Live instance.
- Click on the preset folder icon.
- Right-click or touch-and-hold on the preset.
- Select “Rename” from the dropdown menu.
- Type a new name and press Enter.
Deleting presets:
- Select a Soothe Live instance.
- Click on the preset folder icon.
- Right-click or touch-and-hold on the preset you want to delete.
- Select “Delete” from the dropdown menu.
On Fourier transform.engine, for now, please use the device’s internal preset management to save and load your custom presets. You can access factory presets by pressing the presets button on the top of the plug-in window.
7. Miscellaneous
7.1 Stereo processing
The stereo instance of Soothe Live sums the channels for analysis, and only the mid channel is analyzed. The reduction is applied to both mid and side channels according to the analysis. This is not adjustable.
7.2 FAQ and Support
You can find our FAQ section on our website: https://oeksound.com/support.
If our FAQ doesn’t answer your question, or if you find a bug, don’t hesitate to email us at: support@oeksound.com.
Appendix A: Technical Specification Charts
| Sample rate (kHz) | Latency (samples) | Roundtrip latency VENUE S6L (samples) |
|---|---|---|
| 44.1 | 32 | 64 |
| 48 | 32 | 64 |
| 88.2 | 64 | 95 |
| 96 | 64 | 95 |
| System | No. DSP processors | Soothe Live total mono instances | Soothe Live total stereo instances |
|---|---|---|---|
| VENUE E3 Engine (expandable) | 18 | 54 | 36 |
| Fourier Audio transform.engine | 6 | 78 | 78 |
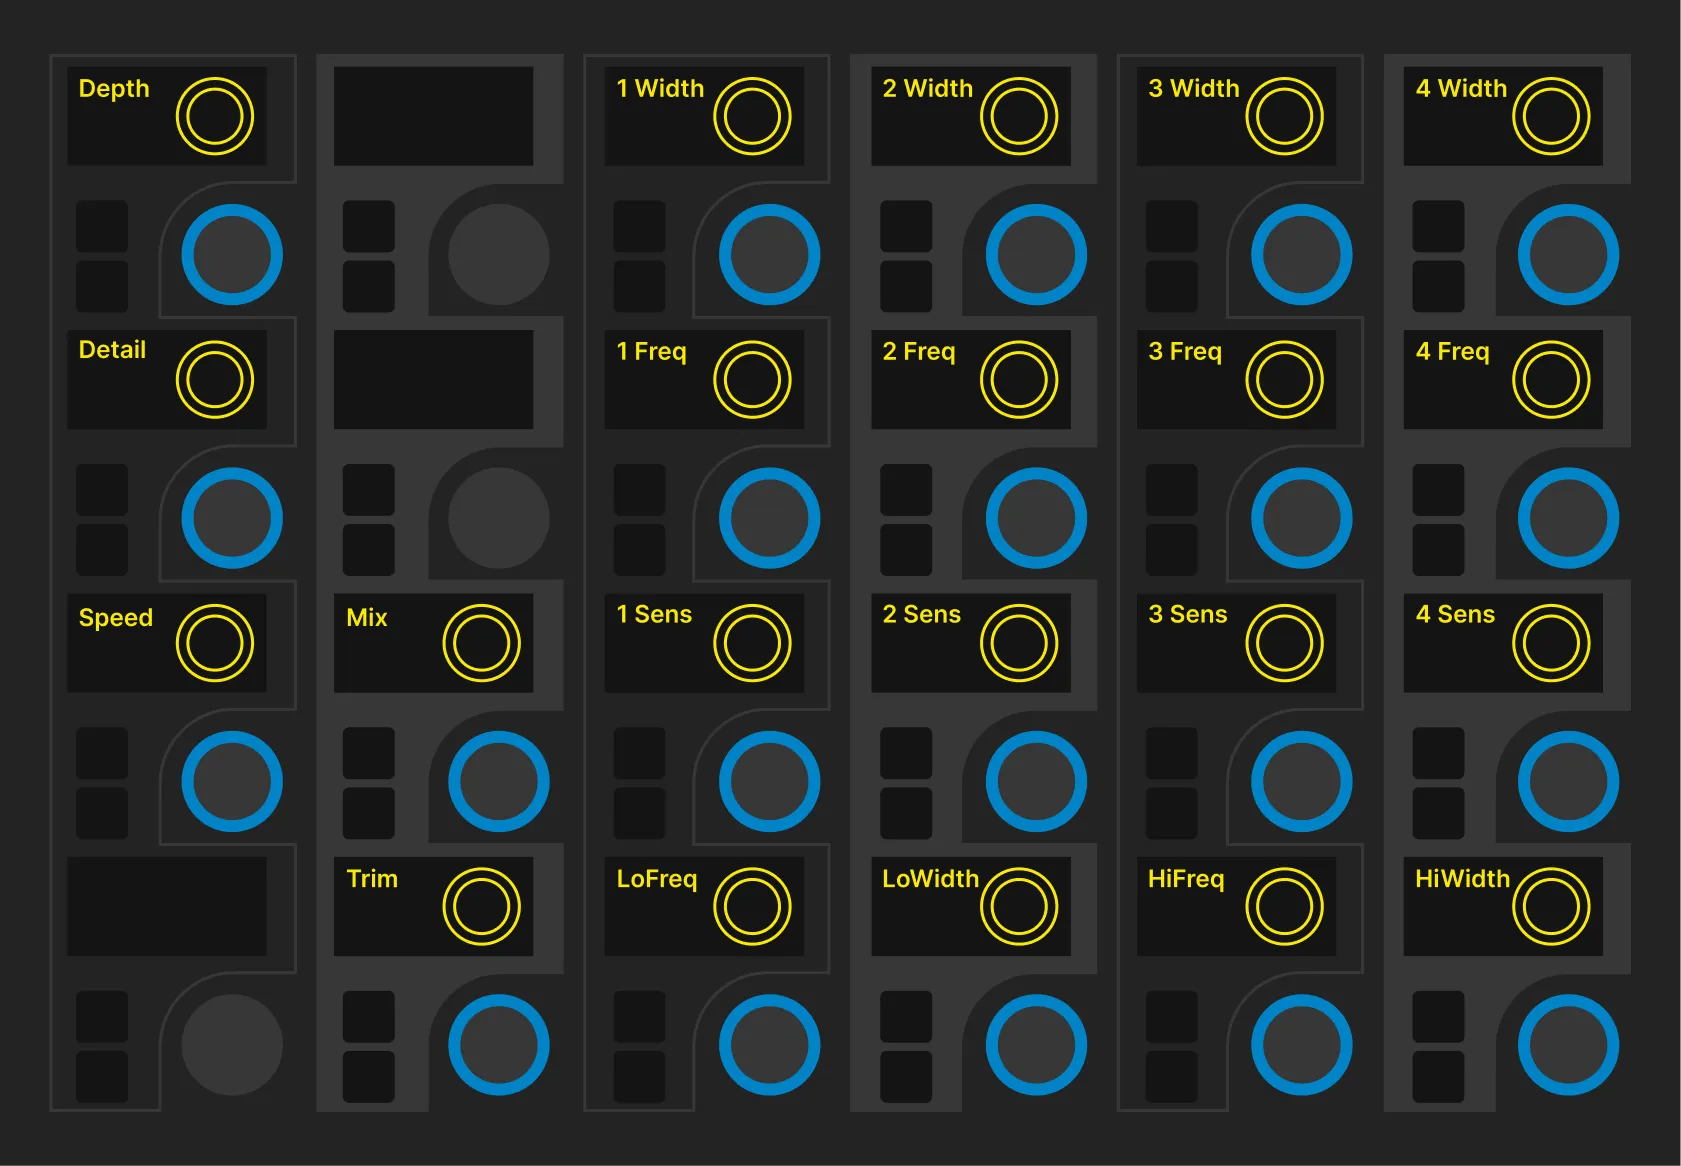
Appendix B: Control Surface Layout