soothe3 user manual
Last modified on May 20th, 2026
- 1. Introduction
- 2. Quick start
- 3. Main section
- Processing modes
- Depth
- Detail
- Attack
- Release
- 4. Side Panel
- Stereo section
- Tilt section
- Scale section
- 5. Reduction graph and depth curve
- Working with bands
- Band Controls
- Node controls
- 6. Footer
- Bypass
- Delta
- Mix
- Out gain
- Quality selector
- Low latency mode
- 7. Toolbar
- Sidechain section
- Preset menu
- Undo/redo
- Comparing settings with A/B switching
- Help button
- Settings menu
- Window resize
- 8. Multichannel operation
- Assigning bands to channels and controlling stereo pair linking
- Multichannel controls
- Multichannel link options
- Multichannel metering
- 9. Miscellaneous
- 10. Paths for presets and uninstallation
- macOS
- Windows
- FAQ and support
1. Introduction
Soothe3 is a dynamic resonance suppressor. It adaptively detects resonant peaks in the incoming signal and reduces them with a dynamic filter that updates in real time. Soothe can be used on individual channels to tame harshness and boominess in instruments and vocals. It can also be used on buses to tame frequency build-ups, or on the master to remove resonances with surgical precision.
2. Quick start
- Start with the default factory preset and turn the depth up until you notice Soothe attenuating too much. Then, back off the depth slightly.
- Adjust detail to suit the input material – less detail to treat frequency build-ups and more detail to target more specific resonances.
- Engage delta to only hear the changes Soothe is making to your signal.
- Use the nodes on the reduction graph to focus the processing. Boost a frequency area until you hear the resonances you want to remove.
- Turn off delta monitoring and find an optimal depth value.
- Use bypass to evaluate the result of the processing.
3. Main section
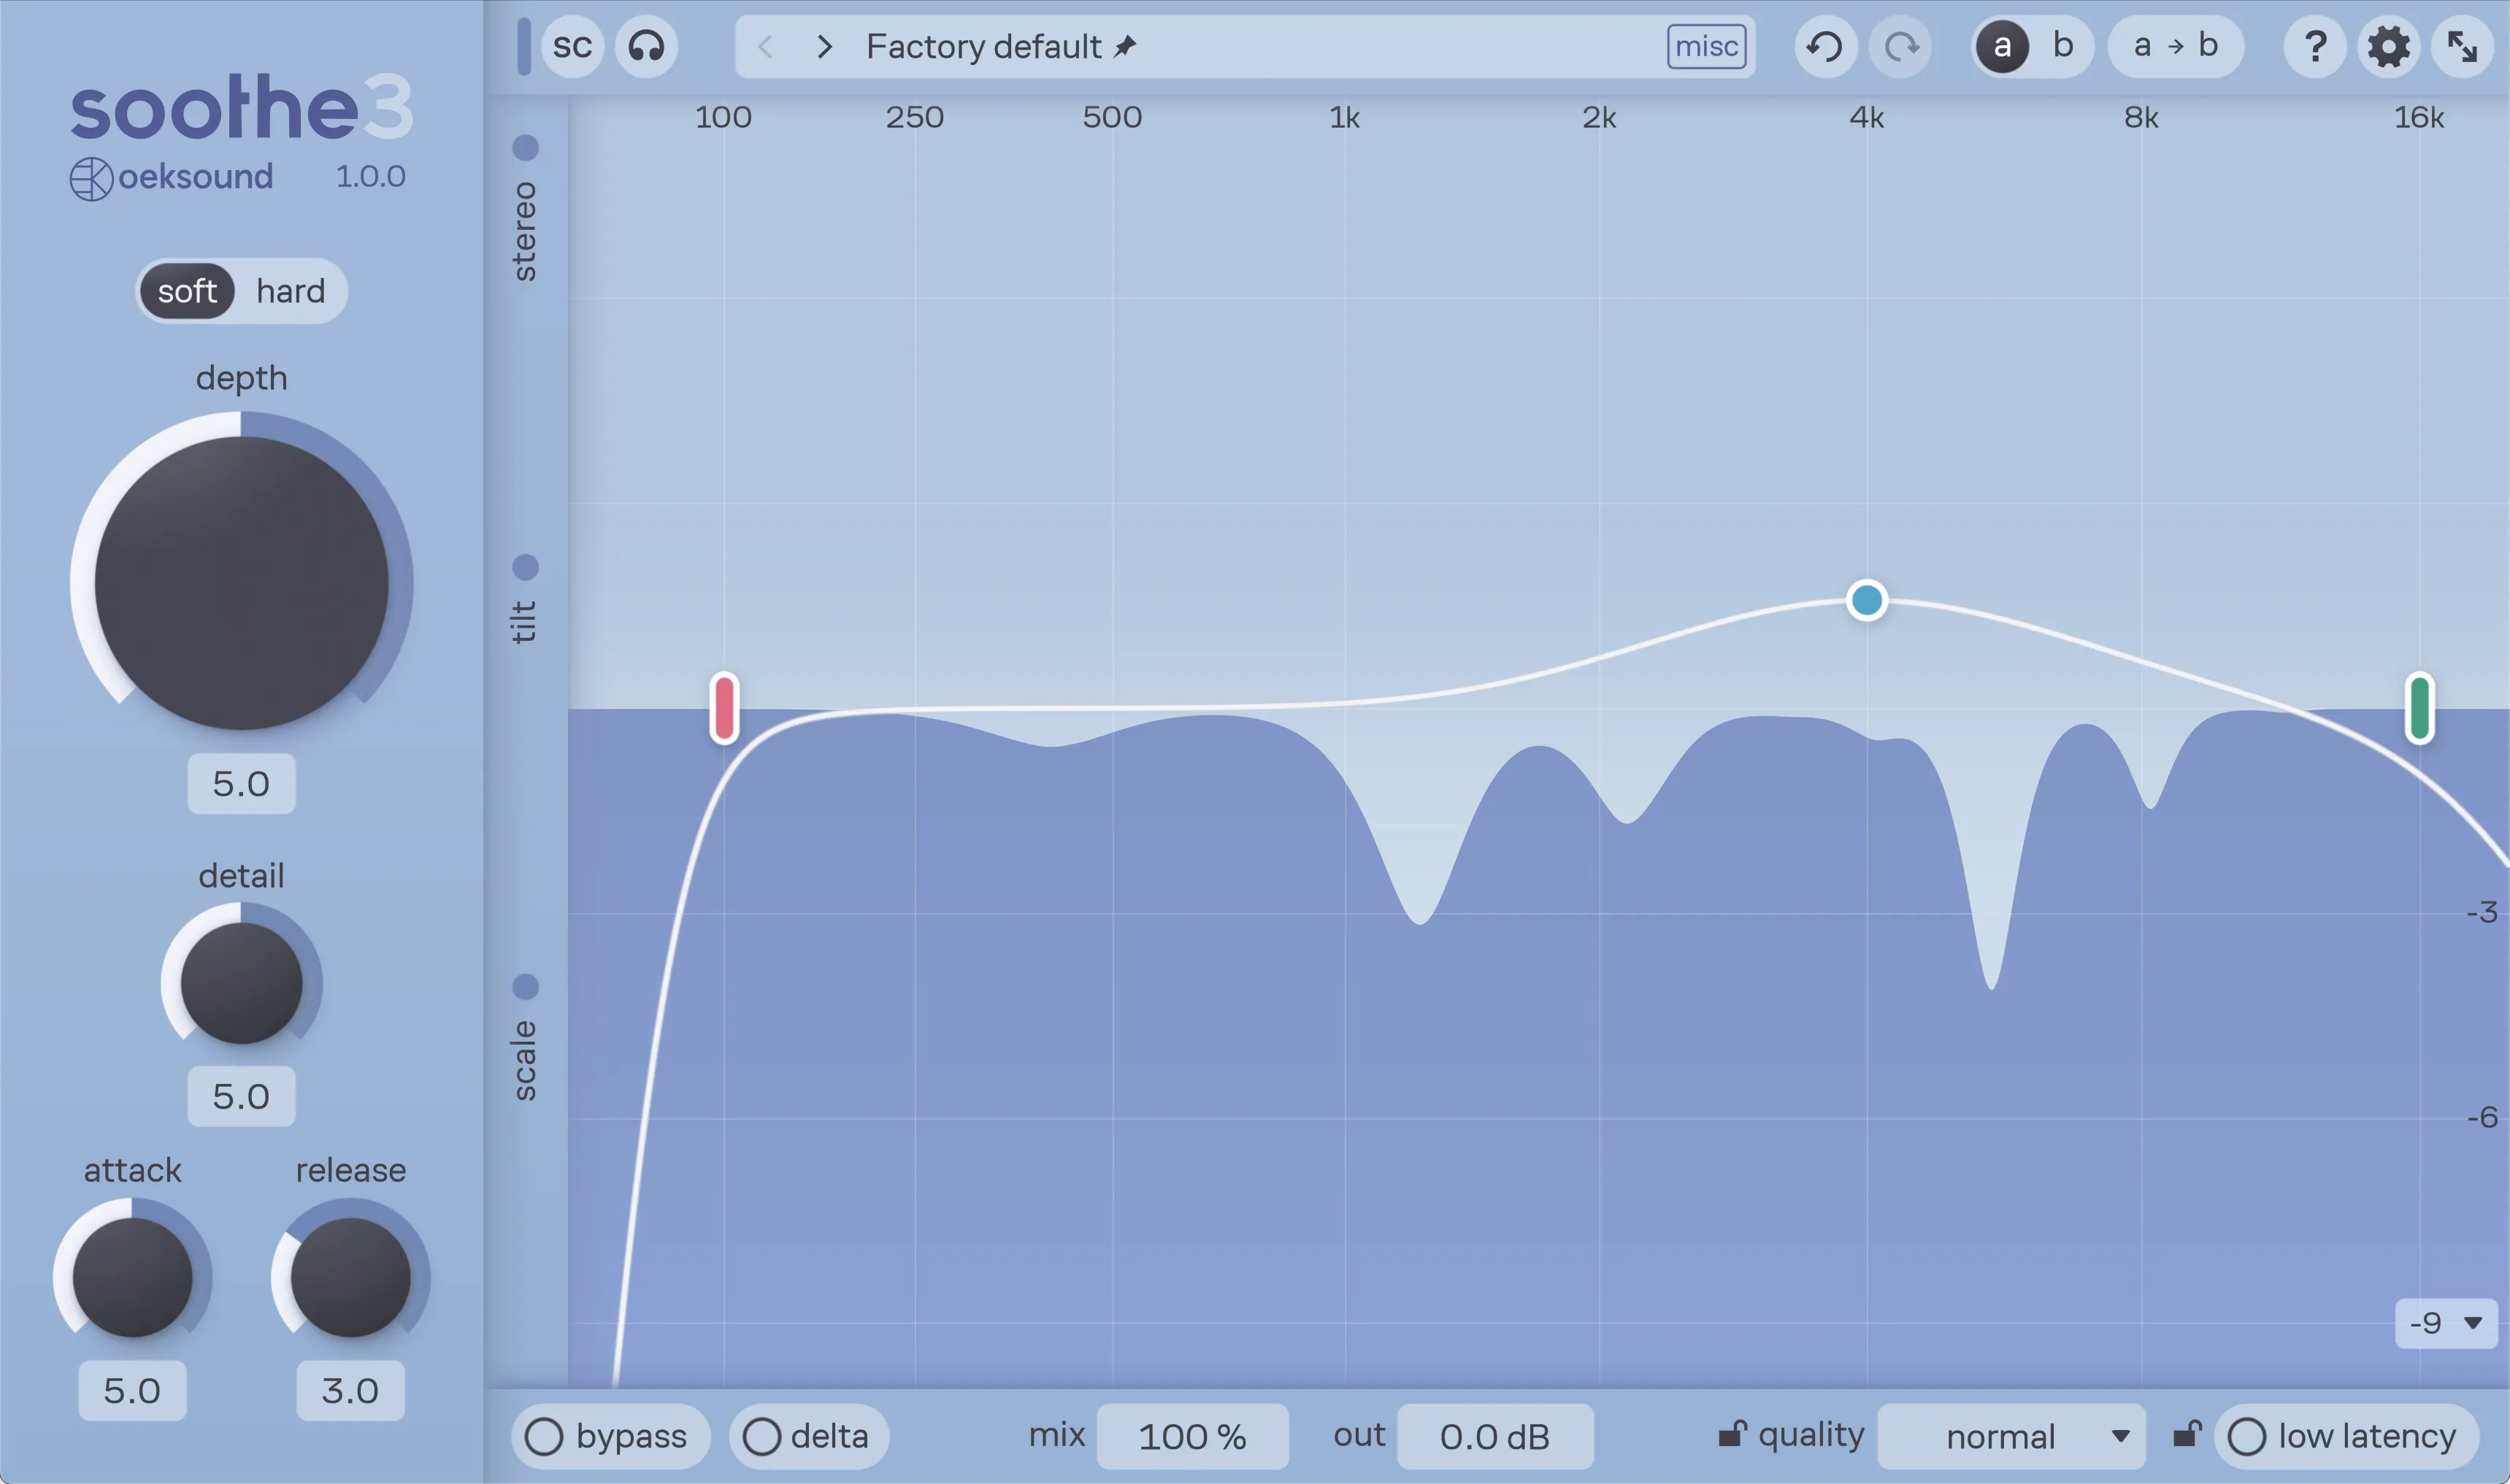
The main section houses the most important controls for operating Soothe effectively.
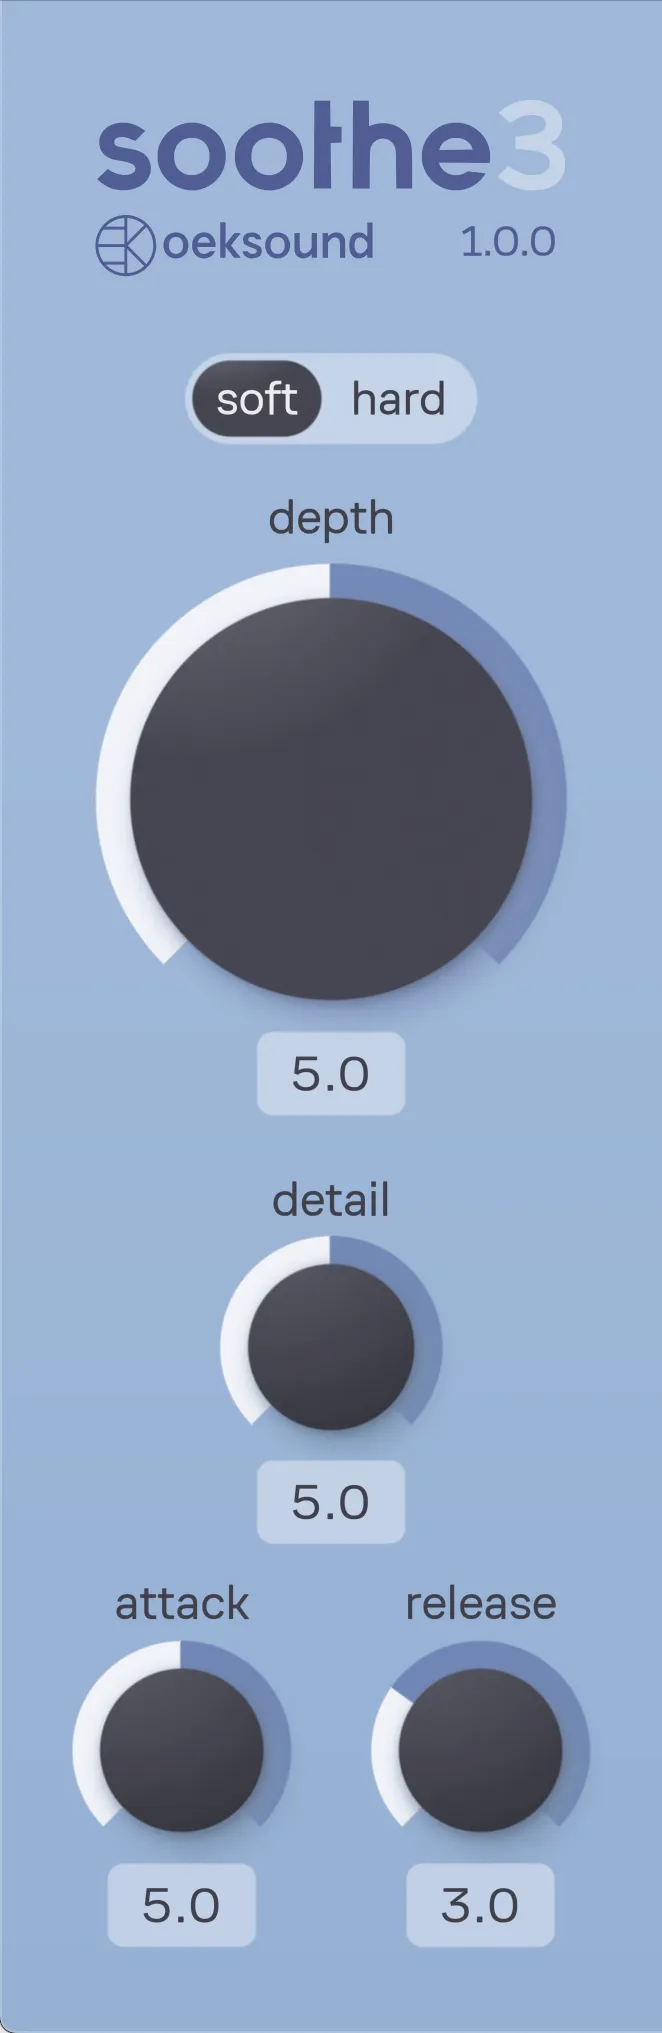
Processing modes
Soothe provides two processing modes. Select the one that best suits your task; each mode employs a distinct algorithm for specific applications. Both modes operate in minimum-phase by default.
Soft mode uses an adaptive threshold, so it behaves the same regardless of input level. Instead of absolute input levels, it reacts to the relative changes in the tonal content. It is a good starting point for taming resonances and frequency buildups with good transient preservation and low distortion. This mode is useful when a stable reduction is desired, even with signals that have a wide dynamic range between phrases, such as vocals.
Hard mode is carried over from Soothe2 with tweaks. This mode is more aggressive and level-dependent. It reacts to the absolute levels of harmonics. It can be driven hard with a high depth setting to fundamentally change the character of the input signal. This is useful for sound design. With lower depth settings and gain staging, it remains useful whenever firmer control of the input signal is required.
Depth
Depth controls how much processing is applied to the signal: more depth results in more reduction. Depth adjusts the overall level of reduction, while reduction across frequencies can be tuned using the depth curve, described in chapter 5. Depth behaves differently according to the selected processing mode.
Soft mode: An adaptive threshold automatically tracks the input signal and detects resonances based on their relative prominence. Depth adjusts the degree of suppression for detected resonances, ranging from subtle smoothing to strong reduction.
Hard mode: Depth sets the internal threshold that controls the amount of reduction applied to any resonances, ranging from gentle smoothing to heavy suppression.
The numeric depth value does not represent the absolute dB reduction; this is shown in the reduction graph. Depth has a greater range than what is usually required. This is to open up possibilities for creative uses. Cranking the depth all the way up can result in up to 40 dB notches that will mangle the sound source beyond recognition.
Detail
Detail controls how narrow Soothe’s cuts are. Higher detail results in deeper and narrower cuts. High detail values can be beneficial for sharp, resonant audio material, such as drum overheads. Low detail values can be good for addressing general energy build-ups both in individual instrument channels, busses, and master channels.
In soft mode, high detail values use slightly slower time constants for resonance detection to minimize the artifacts that usually come with steep and narrow cuts. This allows you to finesse even complex material, making surgical cuts with minimal damage to the source signal.
If a high detail setting in soft mode doesn’t reduce the resonances enough, you can try switching to hard mode. Note that too high detail settings when using hard mode can introduce unwanted artifacts. Removing all resonant frequencies leaves you with a signal composed mainly of noise and inharmonic distortion.
Attack
Attack determines how quickly the processor reacts to resonances. A high attack value results in a slower response and vice versa, similar to compressors. The attack value is not a specific time value since the actual response times are frequency-dependent. Attack speed is generally faster at higher frequencies, but the response can be fine-tuned with the attack tilt control.
Increase the attack to allow more transients through the processing. Decrease the attack to have Soothe follow the envelope of the input signal more aggressively. Using slower attack values can make the signal sound more forward, while faster attack times can push the sound source deeper into the sound stage. We recommend that you find the slowest attack value that still reacts firmly enough to resonances without eating too much into the character or envelope of the signal.
Release
Release determines how quickly the notches disappear after the corresponding resonances have disappeared. Like the attack value, the release value is displayed as a constant but is frequency-dependent. Low values result in a fast release, and high values in a slow release.
Increasing the release value can also help avoid processing artifacts, as fast-moving, adapting filters can create audible phase distortion during drastic cuts. Faster release values can sound breathy, while slower release times can sound more stable. We recommend finding the fastest possible release value that works for your signal while still avoiding the aforementioned artifacts.
4. Side Panel

The side panel houses many controls for fine-tuning Soothe’s behavior. The panel contains three sections: one for controlling stereo behavior, one for controlling detail and timing values frequency-dependently, and one for limiting the maximum reduction and trimming the processed signal. The panel can be collapsed to hide the controls when not needed. The collapsed state shows indicator lights that are active when the settings differ from the default state.
Stereo section
The stereo section offers options for controlling stereo or mid/side operation, stereo linking, and focusing processing towards one channel.
Stereo mode
Stereo mode toggles between left/right and mid/side processing. All related stereo controls follow this setting. The left/right mode with a low link setting usually works well on source material with hard-panned elements. Mid/side mode with the link at 100% is a good starting point for any complex stereo material. The stereo image typically gets wider when lowering the link setting in mid/side mode.
Link
With the stereo link at 100%, Soothe will sum the channels for analysis and apply the same processing to both channels. When the link is set to 0%, Soothe will act in dual mono and process each channel individually.
Stereo focus
Adjust the stereo focus to control the amount of processing applied to each channel. The symbols on the control change according to the stereo mode.
When you want to focus processing towards the left or mid channel, drag the control downwards. To focus processing on the right or side channel, drag the control upwards.
Tilt section
The tilt controls allow you to change the detail and timing values frequency-dependently. All of the tilt controls provide separate parameters for low frequencies (below around 500Hz) and high frequencies (above around 2kHz). The area of effect is displayed as a glowing element on top of the reduction graph when the cursor is hovering over any of the tilt controls.
Increase the tilt by dragging up from the control and decrease it by dragging down. You can also input the value as text by double-clicking on the value that appears when hovering over the control.
The controls affect the main parameters like low and high shelves with a very gentle and gradual slope. For example, a fully maxed-out low tilt of the attack slows down the attack fully for frequencies below 300-400Hz, slows down the attack somewhat around 500-600Hz, and still has a small effect on the attack for frequencies around 1kHz.
Detail tilt
The detail tilt control lets you gradually scale the detail value separately in both low and high frequencies. You can use the detail tilt when you’re happy with the overall tightness of cuts Soothe is making, but when you’d like the cuts to be more surgical in just the high frequencies, for example.
Attack tilt
The attack tilt control lets you gradually scale the attack value in both low and high frequencies separately. You can use the attack tilt when you would like to relax the attack in the bass frequencies to let more punch through, for example.
Release tilt
The release tilt control lets you gradually scale the release value in both low and high frequencies separately. You can use the release tilt when you want to make the release faster in the low end to bring the bass more forward in the mix, for example.
Scale section
Max cut
This control lets you limit the maximum reduction Soothe applies to your signal. You can use this control to use harder depth settings to make more cuts in general, while ensuring that the maximum amount of reduction never exceeds a certain amount.
Applying max cut on your signal creates a new gray-shaded area in the reduction graph. This area represents the limit that Soothe will not cross when reducing resonances.
Wet trim
Wet trim sets the output level of the processed signal. It sits before the Mix control in the signal path. Use it to compensate for any level change that occurs during processing and to ensure the mix control’s percentage value remains accurate.
5. Reduction graph and depth curve
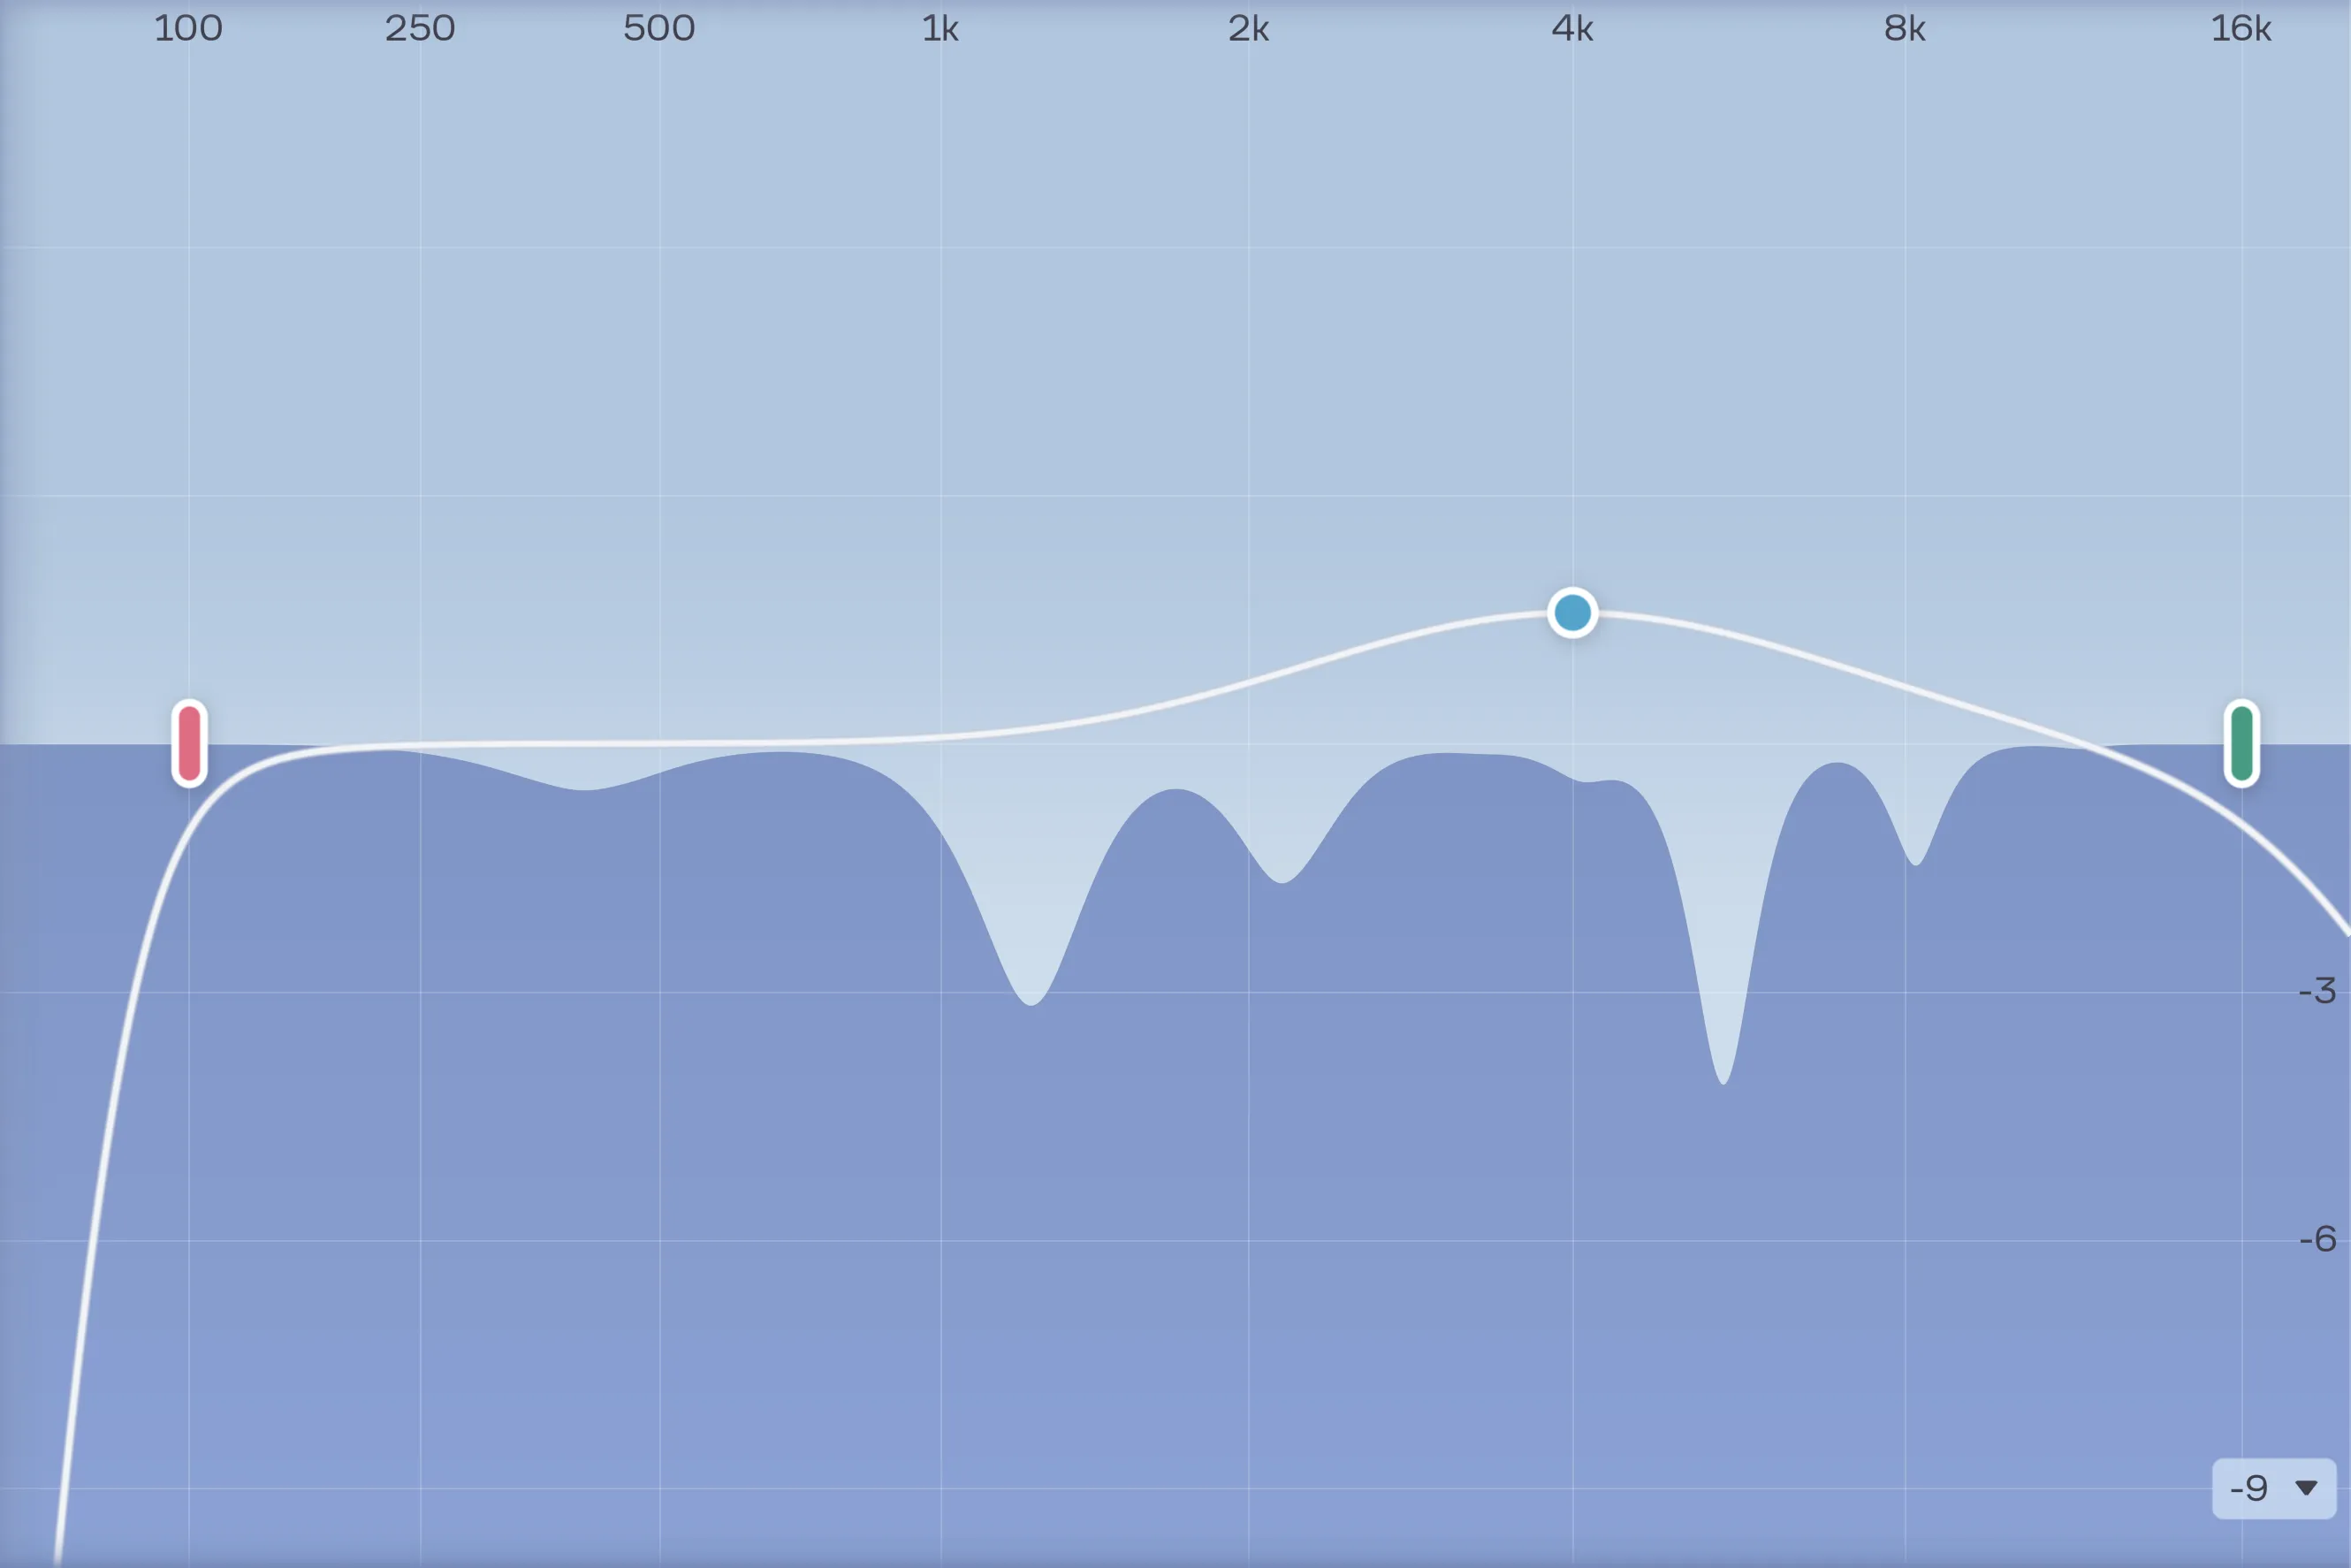
Soothe features a real-time reduction graph – the bottom half of the figure – that displays the parts of the signal being reduced. The graph also displays frequency axis horizontally, and the axis for the amount of reduction in decibels vertically.
The depth curve is shown overlaid on the reduction graph. This curve controls the amount of processing applied across frequencies. You can shape this curve with EQ-style bands. Think of it as an inverse EQ, or like a sidechain EQ that guides where suppression happens. Boosting a band increases resonance suppression in that range. Cutting a band decreases resonance suppression in that range.
Use the depth curve together with the depth control to fine-tune the response. First, set the depth so that Soothe roughly reacts as needed. Then adjust the depth curve to refine where and how much suppression occurs. With the depth curve, you can manually guide Soothe to act more aggressively on a specific frequency area, while simultaneously preventing Soothe from cutting too much in other frequencies.
You can be as precise as you want with Soothe: limit the depth curve by using low cut and high cut filters to allow Soothe to process only certain limited frequency ranges. For the most surgical use, you can employ bandpass nodes, which allow you to be very selective with the frequencies you want to process. You can create multiple bandpasses to treat different frequency areas, and they are routed in parallel.
Since unlinked stereo settings are available, the depth curve and reduction graph can both split into two. In this case, the white section of the depth curve always displays the curve for the left or mid channel, and the dark section of the depth curve always displays the curve for the right or side channel. When the cuts diverge for the unlinked channels, the reduction graph shows cuts on the mid or left channel in a darker shade and cuts on the side or right channel in a lighter shade.
Working with bands
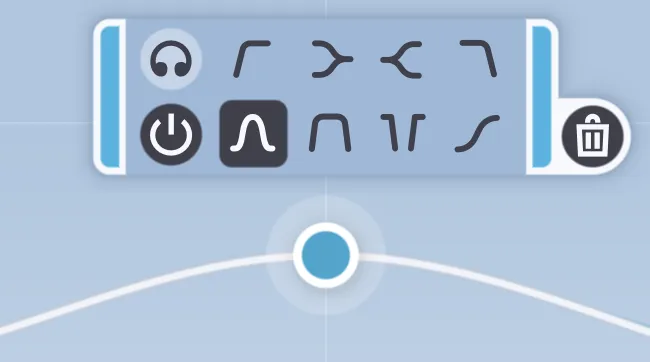
You can create up to eight bands on the curve by double-clicking anywhere on the reduction graph. A band with a corresponding node is placed at the cursor position, letting you shape the curve quickly. Double-clicking near the low or high end of the reduction graph creates a low cut or high cut band, respectively. You can also right-click instead of double-clicking to select a specific band shape before creating the node.
Adjust the band parameters by dragging the nodes on the reduction graph or by using the knobs in the band controls. You can also use the mouse wheel or scrolling gestures to adjust the nodes or knobs. Different adjustment options are available in conjunction with modifier keys. A detailed run-through of them is available in the manual’s “Modifiers” section.
Band Controls
You can select any band by clicking its node on the reduction graph. The controls for a selected band are shown in a separate panel at the bottom of the reduction graph.

Band enable/bypass
The ![]() Power icon toggles the selected band on or off. A band can also be bypassed or enabled by double-clicking its node. Note that bypassing a band removes the band’s effect on the depth curve. It does not remove processing entirely from the band’s area.
Power icon toggles the selected band on or off. A band can also be bypassed or enabled by double-clicking its node. Note that bypassing a band removes the band’s effect on the depth curve. It does not remove processing entirely from the band’s area.
When enabled, the node is shown as a solid, filled circle, and the band affects the white curve. When bypassed, it’s shown as a hollow circle, and the band doesn’t affect the processing.
Band listen
Switch on the band listen by clicking on the ![]() headphones icon next to the enable/bypass button. By default, band listen plays back the delta signal of an individual frequency band. If you want to solo listen the frequency band instead, you can disable the setting Band listen: use delta in the settings menu.
headphones icon next to the enable/bypass button. By default, band listen plays back the delta signal of an individual frequency band. If you want to solo listen the frequency band instead, you can disable the setting Band listen: use delta in the settings menu.
Band shape
Sets the shape of the selected band. The band types on offer are low cut, low shelf, high shelf, high cut, bell, bandpass, band reject, and tilt.
Band frequency
Controls the center frequency of the selected band. The frequency is shown in hertz (Hz). Frequencies in the kHz range can be typed in the textbox in any of the following formats: “6300”, “6k3”, “6.3k”, or “6,3k”.
Band depth
Sets the amount of boost or cut to the depth curve in the area of the selected band. Increase this control to apply more reduction locally.
Band Q or slope
This control displays either the Q-value or slope of the selected band, depending on the chosen shape.
You can also use the scroll wheel when pointing at a node on the reduction graph to change its Q or slope.
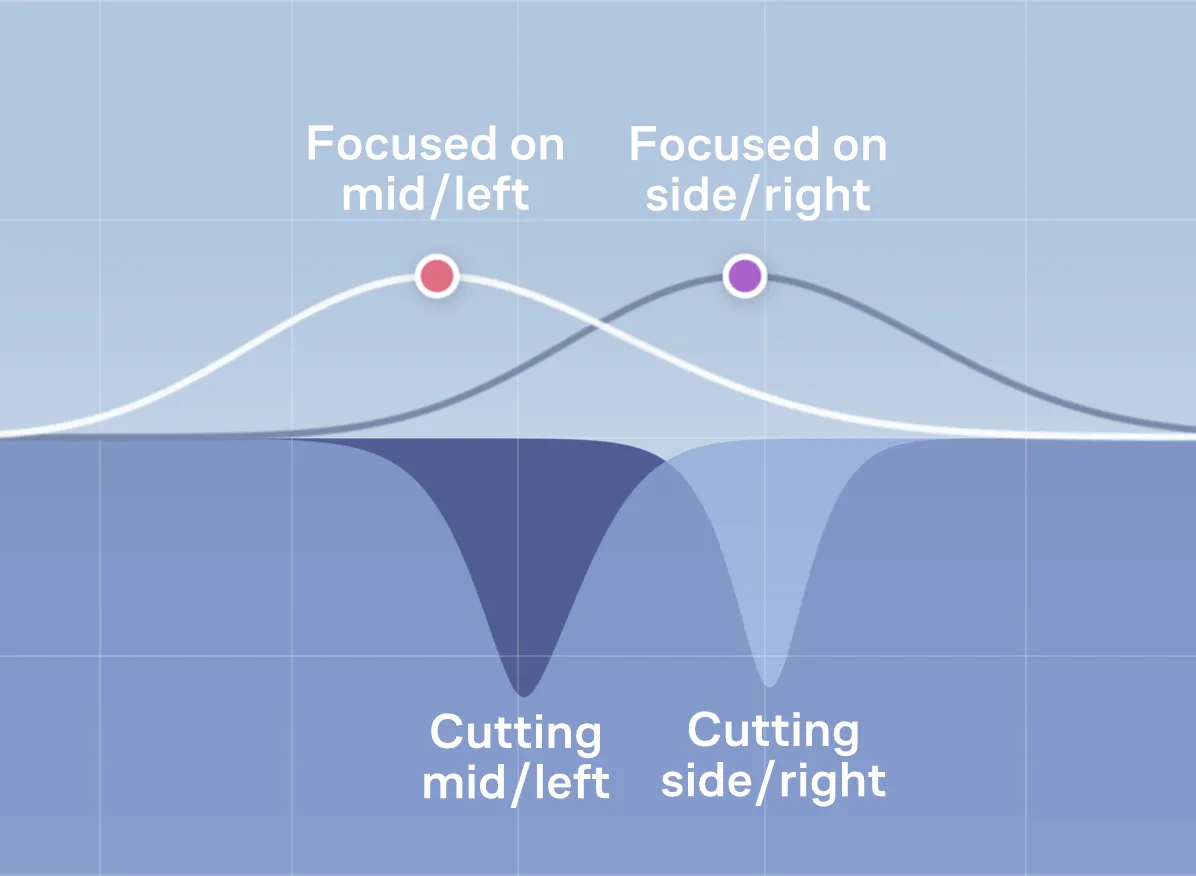
Band focus
The band-specific stereo focus control lets you set the balance of the selected band based on the main stereo mode. If the plug-in is in mid/side mode, the per-band depth curve adjustments will also be applied in mid/side mode. This allows you to rebalance the depth curve’s emphasis within a specific frequency range.
When Soothe is on a multichannel track, you can assign nodes to single stereo pairs and different channel sets in the surround configuration. Please see chapter 8. Multichannel operation for further details.
Band delete
Clicking on the ![]() trashcan icon will delete the band and remove its effect on the depth curve.
trashcan icon will delete the band and remove its effect on the depth curve.
Node controls
Many band controls can be adjusted by directly interacting with nodes on the depth curve.
Selection
Select a node by clicking on it. To unselect a node, click anywhere on the graph apart from a node. Multiple bands may be selected for editing by dragging a box around the nodes or by Shift ⇧ -clicking nodes.
Node control menu
Right-clicking on a node brings up the node controls: A set of duplicate parameters from the band controls for easy access. These controls also affect other selected nodes when multiple are selected.
Enabling and disabling a band
Double-clicking a node toggles the band bypass state.
Disable multiple nodes by selecting them and double-clicking one of the selected bands. This is a quick way to create a flat curve starting point.
Modifiers
| Mac | Win | |
|---|---|---|
| Shift ⇧ | Shift ⇧ | Finetune values when dragging/scrolling a node or knob |
| ⌘ Cmd | Ctrl | Change Q when dragging a node Adjust stereo balance by scrolling a node Create a bandpass node when double-clicking to create a node |
| ⎇ Opt | Alt | Enable band listen when dragging a node Reset value when clicking a text box |
6. Footer
 In the footer section, you can adjust the monitoring and levels. You can also find the quality settings and access the low-latency mode.
Bypass
Bypass is a soft bypass for quick A/B comparison, eliminating glitches that some DAWs may introduce when bypassing the plug-in from the host. Please note that Soothe continues to compute the output, so bypassing the plug-in with this control won’t save you any processing power. To completely disable the plug-in, you should always deactivate it from the host.
Delta
Delta is the difference between the dry and wet signals. Enable delta to monitor the part of the signal that Soothe is removing. Delta helps you understand which frequencies are affected by the current settings, much like boosting a frequency with an EQ helps you determine what to cut. Delta can also be used as an effect by leaving it on.
Mix
Adjust the wet-dry ratio using the mix setting. When the mix is at 100%, only the processed (wet) signal is transmitted through the output. At 0%, only the dry (unprocessed) signal reaches the output. You can, for example, apply heavy processing with Soothe and then mix some dry signal back in for more transparent results.
Note that the reduction graph visualizes the processed signal, taking the mix control into account. Lowering the mix value will also result in shallower notches in the graph.
Out gain
Out gain sets the plugin’s final output level. It sits after the mix control in the signal path. Use it to compensate for any level change that occurs during processing, making A/B comparisons with bypass more reliable.
Quality selector
Use the quality selector to select the quality mode between “normal”, “high”, or “ultra”. Changing the quality mode mainly affects the time resolution of the processing. The dynamic filter curves that Soothe applies are minimum phase by default, regardless of quality setting.
The selector also includes a linear phase processing option. Enabling this setting will increase latency. This can be useful when using Soothe in parallel with the mix knob, or when using unlinked processing in mid-side to prevent changes in panning. However, minimum phase is the better default for most situations.
You can lock the current quality selection by clicking on the ![]() lock icon next to it. With the quality setting locked, it won’t change when switching presets.
lock icon next to it. With the quality setting locked, it won’t change when switching presets.
Low latency mode
When this setting is enabled, Soothe runs at low latency, allowing the plug-in to be used, for example, during tracking. The trade-off with low latency mode is that Soothe operates at a reduced time resolution: it does not use lookahead, so Soothe can react a bit late to transients and vibrato.
The added latency in low latency mode is 0 samples at base sample rates. The added latency increases slightly at higher sample rates, but remains only around 1 millisecond.
Latency chart
| Latency in samples | 44.1 kHz | 48 kHz | 88.2 kHz | 96 kHz | 174.4 kHz | 192 kHz |
|---|---|---|---|---|---|---|
| Regular processing modes | 2304 | 2304 | 4704 | 4704 | 9408 | 9408 |
| Low latency mode | 0 | 0 | 96 | 96 | 192 | 192 |
| Linear-phase mode | 3456 | 3456 | 7008 | 7008 | 14016 | 14016 |
You can lock the low latency selection by clicking on the ![]() lock icon next to it. With the quality setting locked, it won’t change when switching presets.
lock icon next to it. With the quality setting locked, it won’t change when switching presets.
7. Toolbar

Sidechain section

You can route an external input into Soothe and use it to trigger gain reduction. Enable the sidechain by clicking on the SC button. Click the ![]() headphones icon to listen to the external sidechain input. Sidechain is only in use when the SC button is lit. The details on routing an external sidechain key signal to a plug-in depend on the DAW you are using.
headphones icon to listen to the external sidechain input. Sidechain is only in use when the SC button is lit. The details on routing an external sidechain key signal to a plug-in depend on the DAW you are using.
When the sidechain key signal is routed to Soothe and the sidechain is enabled, the reduction and the depth curve are based on the sidechained signal.
You can, for example, use a hi-hat channel as the sidechain input to a snare track to control the hi-hat bleed to the snare channel. You can also set up your session so the lead vocals go to a separate bus, carving out space for the vocals by using them as the sidechain key input for the rest of the material. You can combine the sidechain settings with the mid/side stereo mode to settle vocals in the stereo image.
Preset menu

Soothe comes with a selection of factory presets. Click the current preset’s name on the toolbar to open the preset menu.
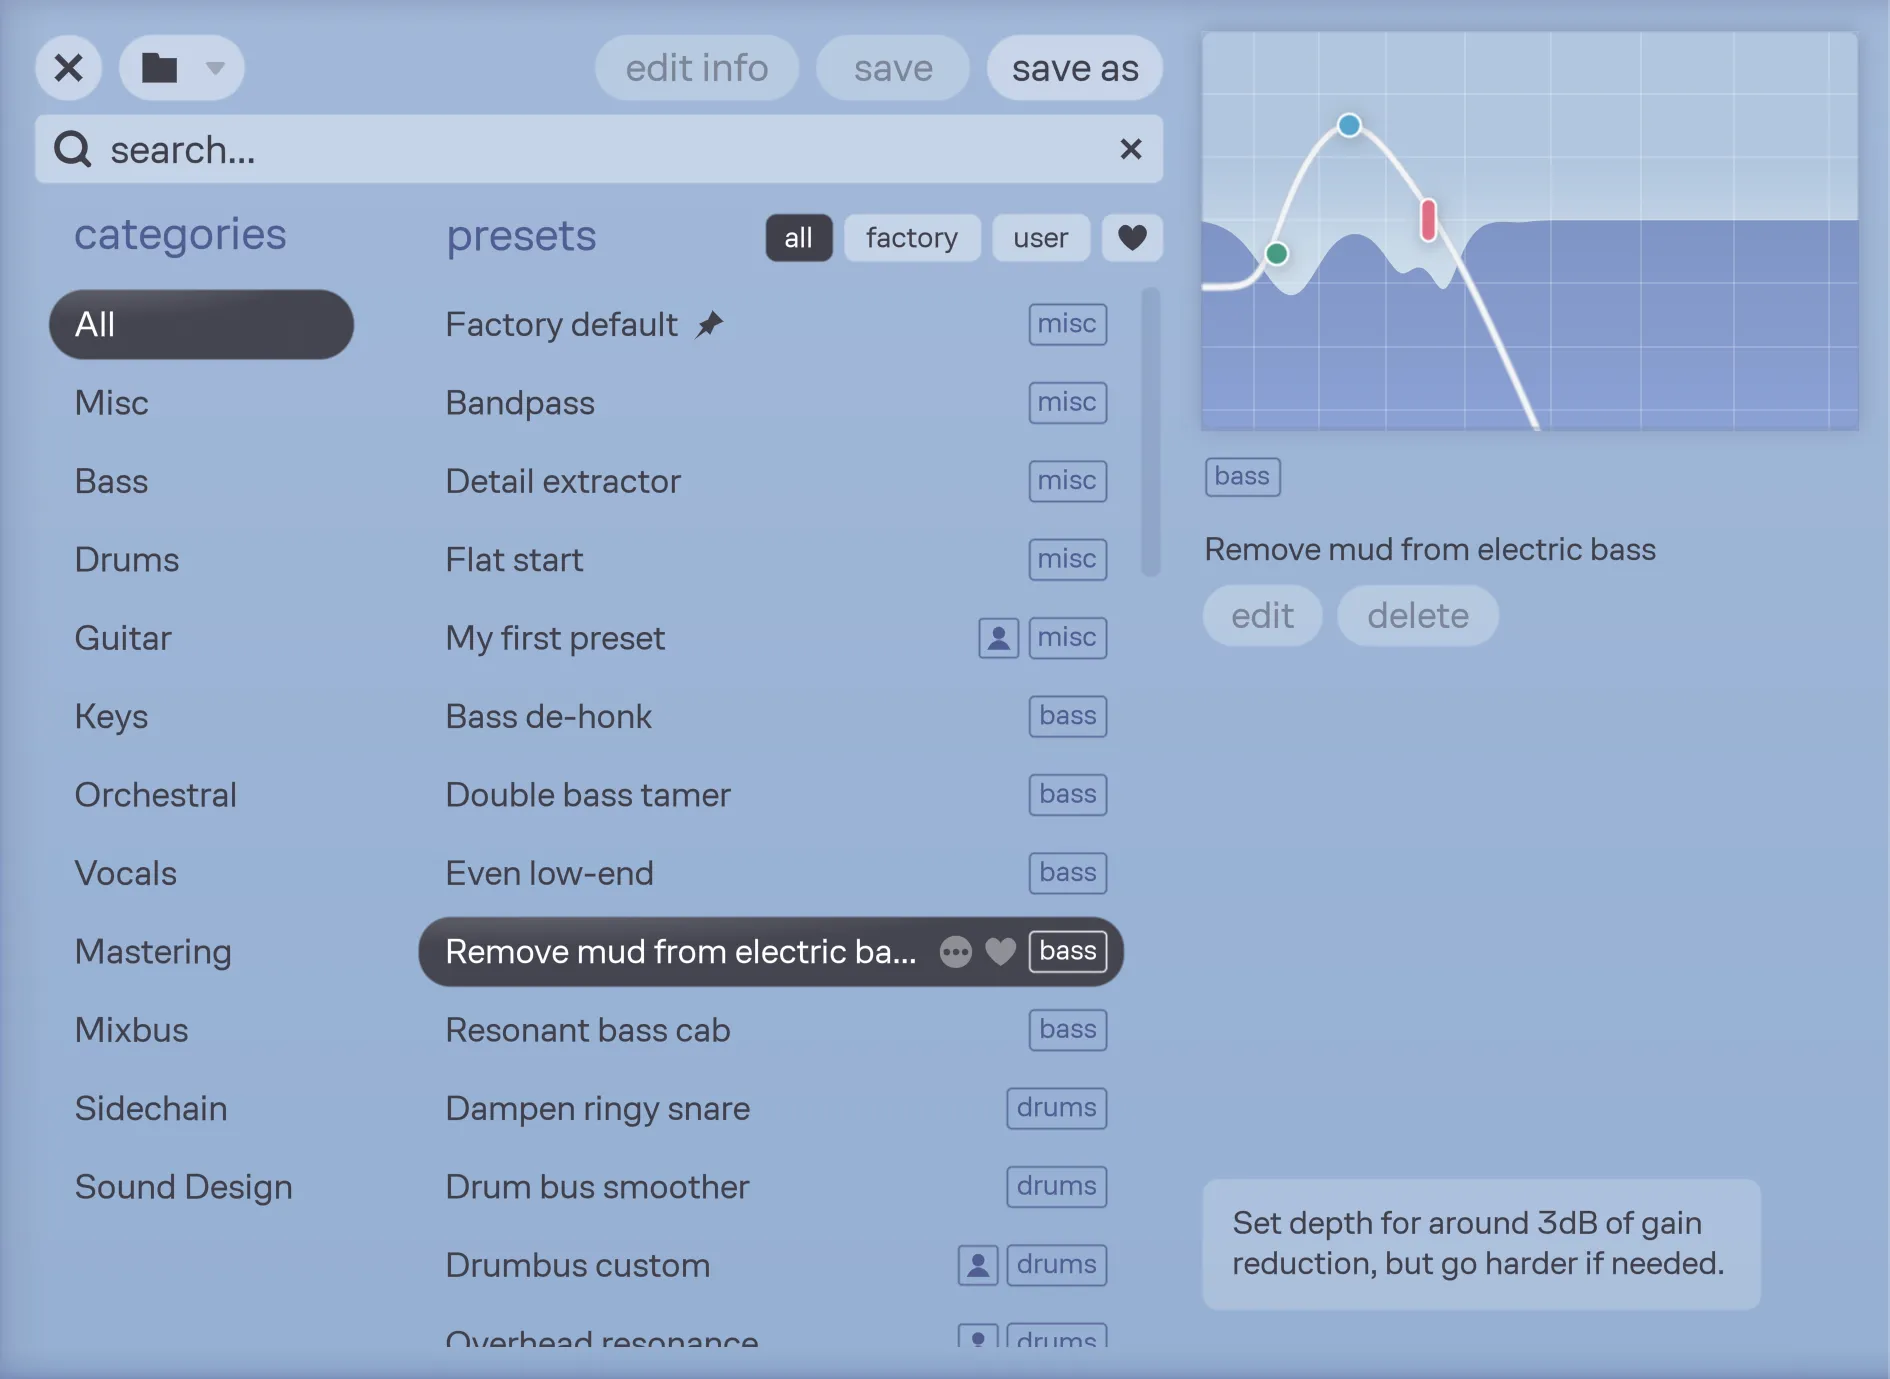
The presets are sorted into categories according to their intended use. The displayed presets can be narrowed down by choosing a category on the left. You can also filter the view using the buttons at the top of the preset list to show factory presets, user presets, favorite presets, or all presets.
The panel on the right shows a preview of the reduction graph of the currently selected preset. It lets you quickly see the shape of the depth curve and its reduction behavior without leaving the preset menu. The panel also shows the preset category, whether the preset is a user preset with the ![]() user icon, the preset name, and buttons for editing preset information and deleting the preset. Factory presets also include a preset description at the bottom of the panel, with tips for using the preset effectively or modifying it to suit your signal.
user icon, the preset name, and buttons for editing preset information and deleting the preset. Factory presets also include a preset description at the bottom of the panel, with tips for using the preset effectively or modifying it to suit your signal.
Clicking on a preset on the list instantly loads it. Navigate to the next and previous preset using the < > arrow buttons in the toolbar. With the preset menu open, you can also browse through presets with the ↑ up and ↓ down arrow keys on your keyboard.
Hovering the cursor over any preset reveals two buttons: ![]() for additional options and
for additional options and ![]() for marking a preset as a favorite.
for marking a preset as a favorite.
Double-clicking a preset selects the preset and closes the menu. You can also click any of the main parameters outside the preset menu to close it. The Esc and ⏎ Enter keys also close the preset menu.
Preset toolbar and search

The top part of the preset list includes some functions and a search bar. The ![]() menu provides functions for preset file management and the other buttons are used for editing and saving the current preset. Presets can be searched either by name or by category.
menu provides functions for preset file management and the other buttons are used for editing and saving the current preset. Presets can be searched either by name or by category.
Favorite presets
Presets can be marked as favorite by clicking the ![]() favorite icon next to the preset name in the preset browser. You can filter the preset browser with the
favorite icon next to the preset name in the preset browser. You can filter the preset browser with the ![]() button to quickly access all your favorite presets.
button to quickly access all your favorite presets.
Loading presets
Presets can be loaded from the preset menu by clicking a preset, or browsed using the < > arrow buttons. The preset menu only displays factory presets and presets in the user’s preset folder. Presets can also be loaded from any other location on your computer by clicking on ![]() menu and choosing “Open preset file”.
menu and choosing “Open preset file”.
Saving new presets
Save the current configuration as a preset by opening the preset menu and clicking “save as”. This lets you name the preset and assign a category to save it in. You can also choose to save the preset as user default, or mark it as a favorite.
You can confirm saving by pressing ⏎ Enter or cancel saving by pressing Esc.
Editing and saving changes to presets
When the current preset has been edited, the preset toolbar displays an asterisk (*) after the preset name to indicate that changes have been made. If you want to commit the changes to the preset file, open up the preset menu and press “save”. You can also click “edit info” to change the category of the current preset, mark it as a favorite, or set it as a default preset.
Note that factory presets cannot be edited, and any changes have to be saved as a new preset using the “save as” function.
Set your default starting point
Any preset can be picked as the initial preset instead of the factory default preset. The default preset will be marked with a ![]() pin icon in the preset browser.
pin icon in the preset browser.
To quickly set any preset as user default, hover over the preset name inside the preset menu, click on the ![]() options icon, and choose “Set as default”.
options icon, and choose “Set as default”.
In Pro Tools, please use its built-in “User Default” feature instead.
Deleting presets
Presets can be deleted by clicking on the ![]() options icon (visible by hovering) next to the preset’s name and choosing “Delete preset”.
options icon (visible by hovering) next to the preset’s name and choosing “Delete preset”.
Alternatively, you can use your computer’s filesystem to delete the preset files. To find the preset folder, click on the ![]() menu icon above the preset search bar and choose “Show user presets in Finder/File Explorer” – or navigate to the default location of the user presets.
menu icon above the preset search bar and choose “Show user presets in Finder/File Explorer” – or navigate to the default location of the user presets.
Undo/redo

Press the undo button to undo the last change made with Soothe’s user interface. Click on redo to redo a previously undone change. There is a predetermined maximum number of undo steps exclusive to both A and B states.
Comparing settings with A/B switching

Two different parameter sets can be saved using the A/B switch. Just select either A or B, adjust the parameter settings you want to compare, and do the same for the other set. Compare the parameters by using the A/B selector to toggle between the states.
Use the A-B copy button to replace the other parameter settings with a copy of the current ones.
Help button
Click on the ![]() Help icon at the right end of the toolbar to access the help menu. From this menu, you can access the PDF version of the manual and visit the Soothe3 website. You can also directly contact oeksound’s support. The help menu also provides a function to copy system information to your clipboard, making it easier to include this information in your support form. The final option opens a text file containing the legal notice concerning Soothe3.
Help icon at the right end of the toolbar to access the help menu. From this menu, you can access the PDF version of the manual and visit the Soothe3 website. You can also directly contact oeksound’s support. The help menu also provides a function to copy system information to your clipboard, making it easier to include this information in your support form. The final option opens a text file containing the legal notice concerning Soothe3.
Settings menu
Click on the ![]() Cogwheel icon at the right end of the toolbar to access the settings menu. From this menu, multiple settings can be configured and they affect all instances of Soothe.
Cogwheel icon at the right end of the toolbar to access the settings menu. From this menu, multiple settings can be configured and they affect all instances of Soothe.
Show tooltips lets you show or hide tooltips.
With Always render on ultra enabled, Soothe will always use the ultra quality setting for all instances of Soothe when bouncing your mix to disk. The exception to this are instances with low latency mode engaged, which will still render using the low latency mode.
The Low latency for all instances setting forces all instances of Soothe to always use low latency, which is useful when using Soothe in a live setting and ensuring that all instances stay in low latency even when selecting presets.
With Band listen: on node drag enabled, Soothe will automatically engage the band listen function for a node that’s being dragged.
With Band listen: use delta enabled, Soothe will play the delta signal of the selected band when using band listen. With this selection disabled, Soothe will just play the frequency area of the band in solo when using band listen instead.
Show frequency near cursor is an accessibility setting, which makes Soothe display the frequency readout next to the mouse cursor at all times.
Soothe also automatically checks for updates and shows you if a software update is available at the bottom of the settings menu.
Window resize
Change the size of the user interface by clicking on the ![]() resize icon, and selecting the size preset from the dropdown menu. The size presets range from small (S) to extra large (XL). If the chosen interface size doesn’t fit your screen resolution, the size selection isn’t applied.
resize icon, and selecting the size preset from the dropdown menu. The size presets range from small (S) to extra large (XL). If the chosen interface size doesn’t fit your screen resolution, the size selection isn’t applied.
You can also dynamically change the interface size by dragging the bottom right corner of the plug-in window.
8. Multichannel operation
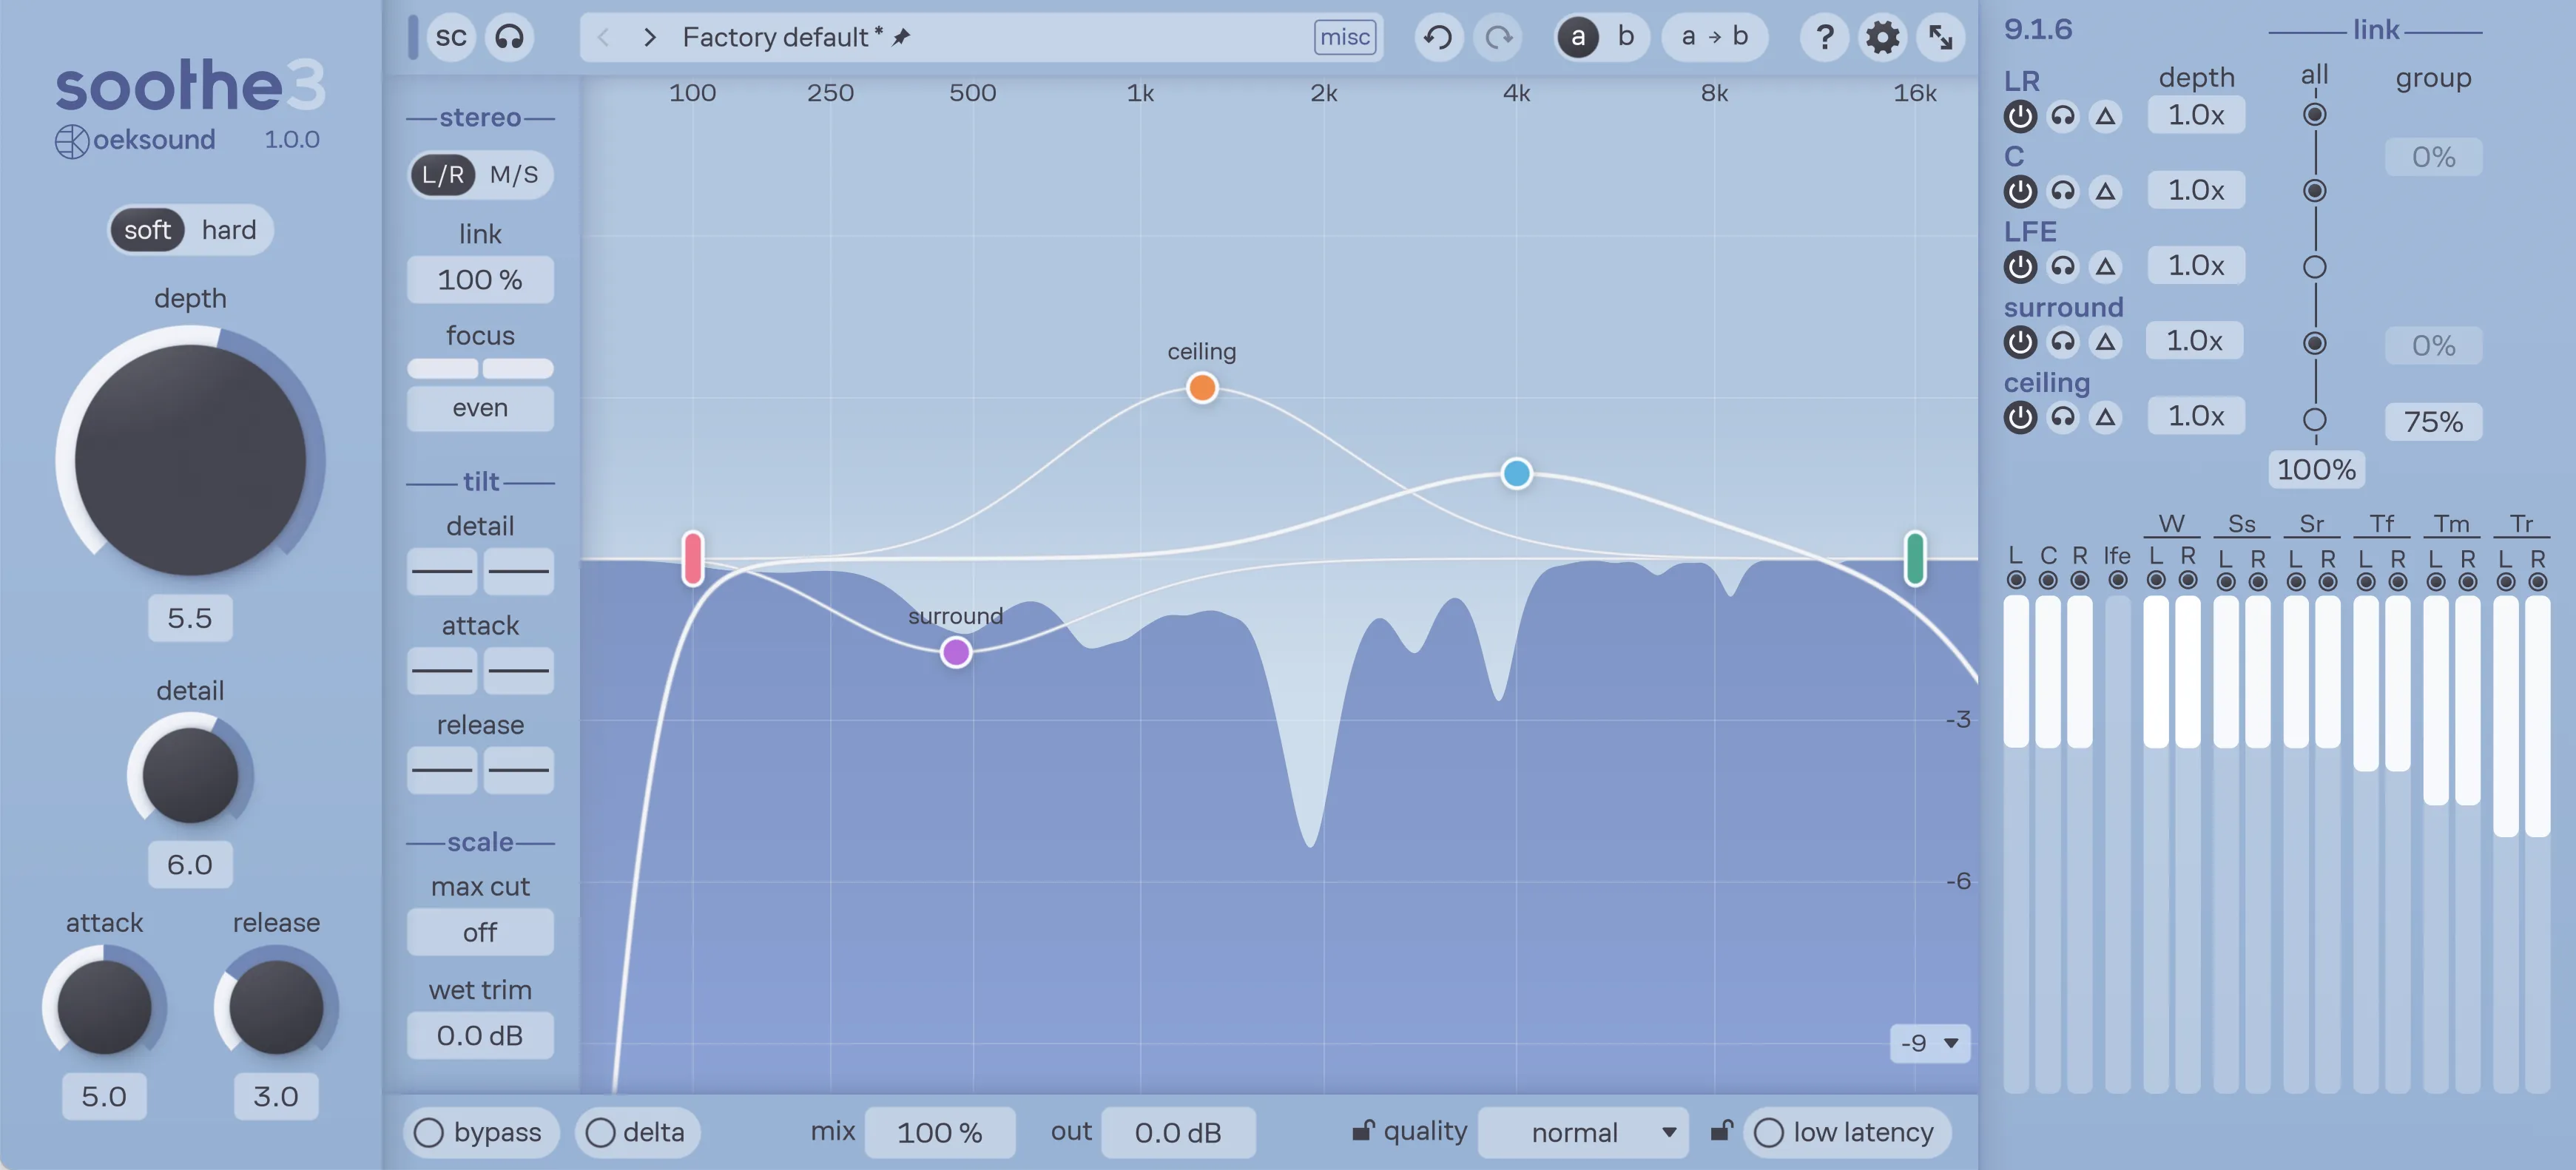
Soothe supports surround and multichannel setups up to 9.1.6. When inserted on a multichannel track, an additional panel appears to the right of the reduction graph, showing multichannel metering and multichannel controls.
The multichannel implementation is based on the concept of channel sets. Depending on your multichannel setup, the channel sets are as follows:
- LR: The main left and right speakers.
- C: The center speaker.
- LFE: The low-frequency effects channel.
- Surround: The surround channel set includes the surround wide, surround side and surround rear speakers, when available.
- Ceiling: The ceiling channel set includes the top front, top middle and top rear speakers, when available.
Assigning bands to channels and controlling stereo pair linking
During multichannel operation, the band controls panel displays a new control above the band shape controls. This allows you to assign nodes to affect only certain channel sets, or even certain channel pairs, allowing you to process specific channels differently from others.
The link and focus controls in the stereo section affect all stereo pairs within the multichannel configuration. To control linking interaction within each channel set, new controls are provided in the multichannel panel to the right.
Multichannel controls
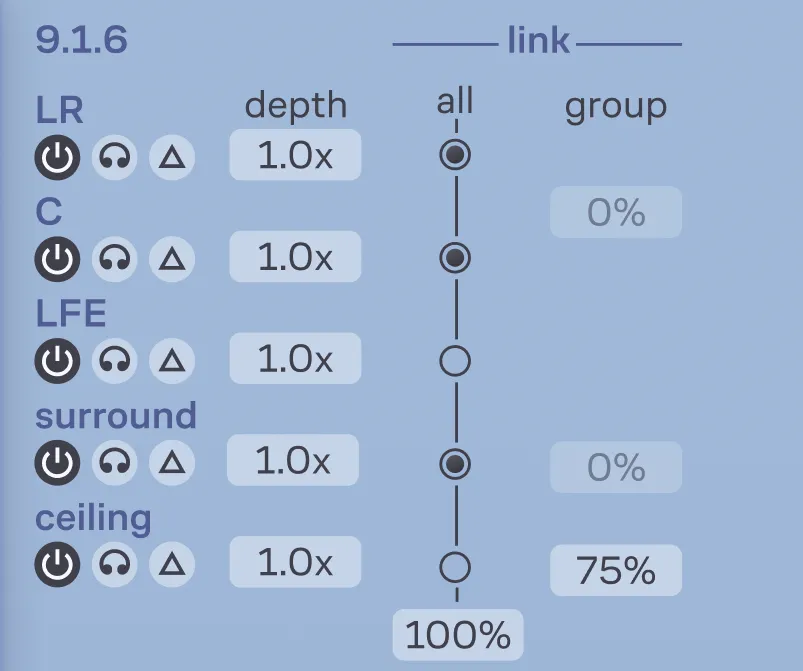
The additional multichannel panel shows the current channel configuration in its header. All available channel sets are listed in a table with various multichannel settings.
The channels column lets you enable/bypass processing for the channel set, listen to the channel set in solo, or listen to the delta in that channel set only. Note that the reduction graph will display the reduction on any channel that’s being listened to with the listen and delta controls.
The depth settings allow you to scale the depth control for each channel. Reducing the depth of a channel set also reduces its weighting in the resonance analysis during linked operation.
The next columns provide two different controls for multichannel linking: the link all control on the left and the group link control to the right:
The channel sets with the link all enabled interact by the amount set by the link all control. You can enable or disable link all per channel set by clicking on the field in the link all column.
When link all is at 100%, all included channel sets have the same reduction. This reduction is based on the sum of every channel’s resonance detection and is scaled via the channel set’s depth control. Note that the stereo pairs can still be unlinked according to the main stereo link control. With the stereo link set below 100%, the left side of the room can have a different reduction than the right side even when the link all control is at 100%.
The group link lets you set the amount of linking within each channel set. Note that a channel set can be linked either by using the link all control, or the group link control, but not both at the same time; they are mutually exclusive. Refer to the table below for examples of the linking options. The main left/right speakers and the center speaker (LR+C) are treated as a channel set for group linking purposes.
Multichannel link options
| Stereo pair linking | Linking within a channel set | Linking between channel sets |
|---|---|---|
| ex: Link surround side left with surround side right. | ex: Link all surround speakers with each other. | ex: Link surround speakers with ceiling speakers. |
| Use the link control in the stereo section of the side panel. | Use the group link control in the multichannel panel. The left and right sides of the channel set can still be unlinked. | Enable link all for the channel sets on the multichannel panel and use the link all parameter. Left and right can still be unlinked. |
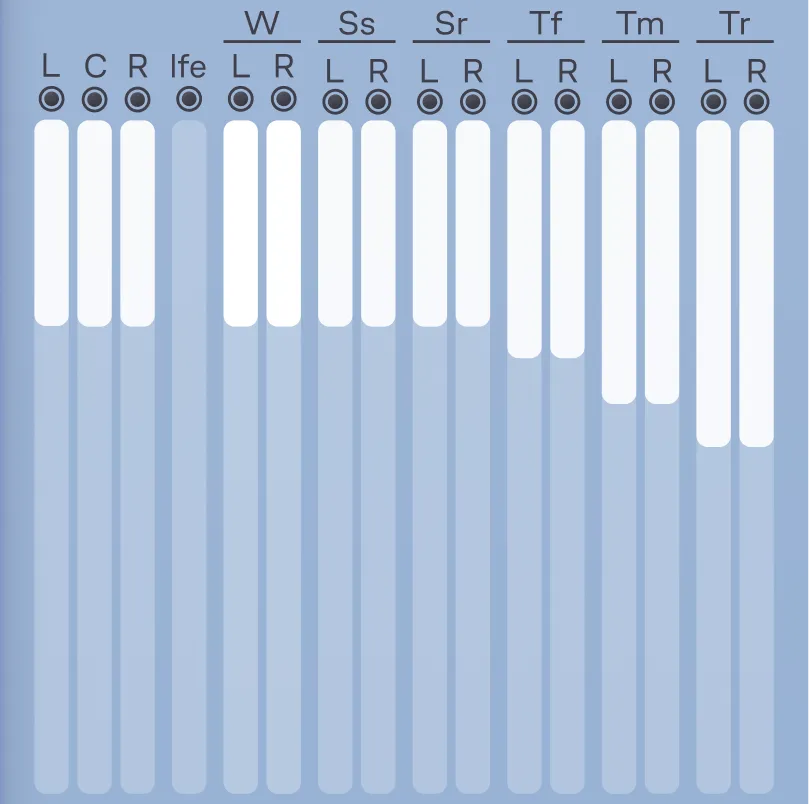
Multichannel metering
The multichannel meters show the maximum amount of reduction that Soothe is making per channel. The meters use the same scaling as the main reduction graph.
Hover your cursor over any of the channel meters or their titles to temporarily see that channel pair’s reduction on the main reduction graph. Use the modifier ⌘ Cmd/Ctrl when hovering to see an individual channel’s reduction graph. The reduction graph will show the name of the currently selected channel pair overlaid on top of the graph.
Click anywhere on the meter or the button above it to bypass processing on that channel pair. Use the modifier ⌘ Cmd/Ctrl while clicking to bypass one channel only.
9. Miscellaneous
Soothe3 automatically checks for new plug-in versions in the background.
When a new version is available, an ![]() circle mark will be displayed on the configuration menu button.
Information about a possible update is shown at the bottom of the Settings menu.
circle mark will be displayed on the configuration menu button.
Information about a possible update is shown at the bottom of the Settings menu.
Updates are provided for good reasons, such as bug fixes and performance improvements. We always ensure that presets are backward compatible with all Soothe3 versions to come. We take great care to ensure that things don’t break between updates.
10. Paths for presets and uninstallation
macOS
User presets:
/Users/<username>/Documents/oeksound/soothe3/Presets
This folder will be created only upon the creation of your first user preset.
The macOS uninstaller can be downloaded separately from our downloads page: https://oeksound.com/downloads/#uninstaller.
Windows
User presets:C:\Users\<username>\Documents\oeksound\soothe3\Presets
This folder will be created only upon the creation of your first user preset.
Please use the “Add or Remove Programs” -function (or similar) to uninstall Soothe3.
FAQ and support
You can find our FAQ section on our website: https://oeksound.com/support
If our FAQ doesn’t answer your question, or if you find a bug, don’t hesitate to email us at: support@oeksound.com
Copyright oeksound Ltd 2026. All rights reserved.
 VST is a trademark and software of Steinberg Media Technologies GmbH.